-
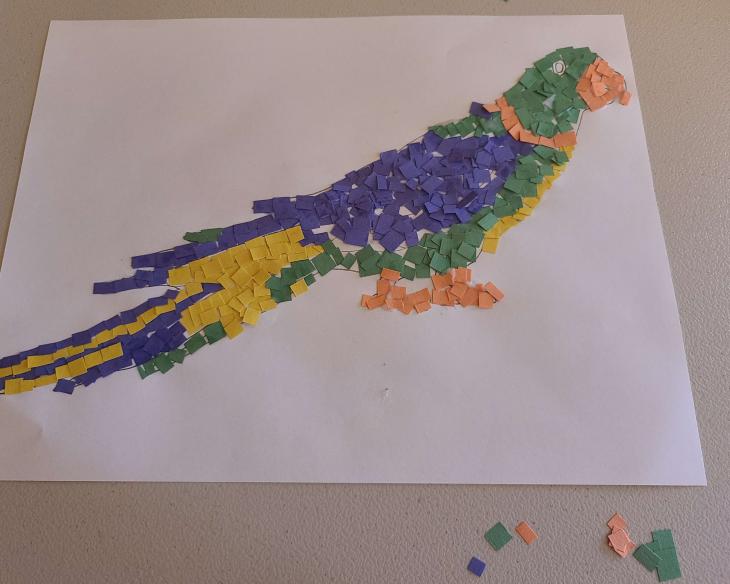
Recreation of Parrot Mosaic
By: Brendan Sipes
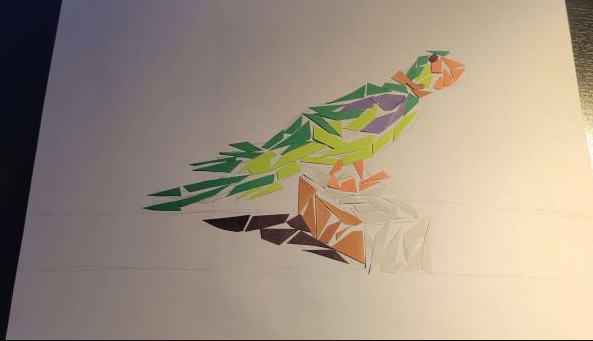
To create my copy of the parrot mosaic, I used different colored construction paper, scissors, a pencil, and a stick of Elmer’s glue.

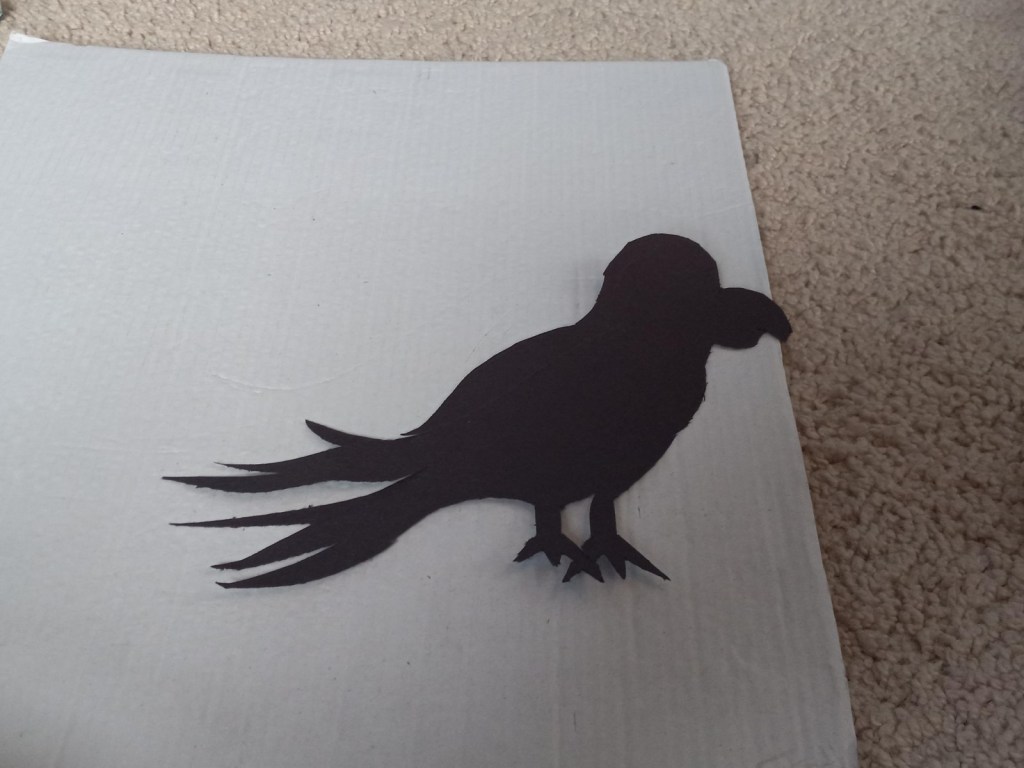
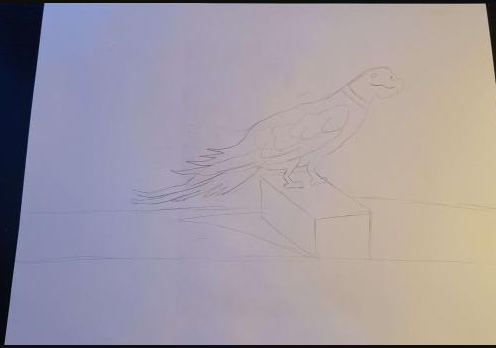
After I gathered all of my materials, I printed out a photo of the mosaic as a reference and drew an outline of the parrot onto a white piece of paper.

After I finished drawing the parrot outline, my next step was to start cutting the construction paper into smaller pieces.

Once all of my pieces were cut out and sorted by color, my final step was to start gluing the pieces onto my original drawing.

A very challenging part of completing this mosaic was how difficult the shape of the parrot was. This made both drawing it and gluing down pieces extremely tedious. There were countless times that a certain piece didn’t fit, and I had to reshape or modify it with my scissors. Creating pieces for the parrots two legs and outward feathers were the most difficult because of how small and distinctively shaped they were.
Another challenge I encountered while creating the mosaic was drawing the parrot. I had originally planned on printing out a photo of the mosaic, putting it under the white piece of paper, and easily tracing the outline for my mosaic. However, after I printed out the photo, I realized that the image couldn’t be seen through the white paper and that I would have to improvise and draw the parrot myself. I am not very good at art and drawing, but in the end the outline turned out better than I had expected.
The task took me about two hours to fully complete and between the hiccup in my original plan and the very difficult abstract shape of the parrot, recreating the parrot mosaic was much harder than I originally anticipated.
-
Building my Mosaic
10/30/22 – The mosaic…
-Jack Geibler

The building of the mosaic begins on the day before Halloween, October 30th. I am returning home from a party the night before, tired as ever. I get home and take an intense 22-minute power nap. Once that was finished, it was go time! I go out to pet smart and buy colored rocks for my mosaic. Then I return home and get to work. A primary focus for my piece was to make it look as it did back when it was created. I showed this by using more vibrant colors that have faded over time. I begin the project by gluing a large piece of paper onto a piece of cardboard to get my background. Then, I sketch out the shape of my mosaic with a pencil. This part was not extremely challenging. The sketch looked very accurate and I had high hopes going into the next step. For the next step, I started placing the rocks onto the background. This part was not so easy. I planned to use a hot glue gun to glue the rocks onto the paper. That did not go very well. The hot glue hardened before I was able to put the rocks on top of it. I managed to get the stones down after using both hands to glue and place them. This was very frustrating because it made the detail look much vaguer. I persevered through and got all of the rocks down into their spots to create the drawing. I was somewhat pleased with my work. I did not get much definition so it is harder to make out the specific details of the mosaic. Also, the rocks came in different shapes and sizes which were difficult to piece them together. I was right when I predicted that the glue would be my downfall. I still persevered and got it as close as possible to the mosaic.
-
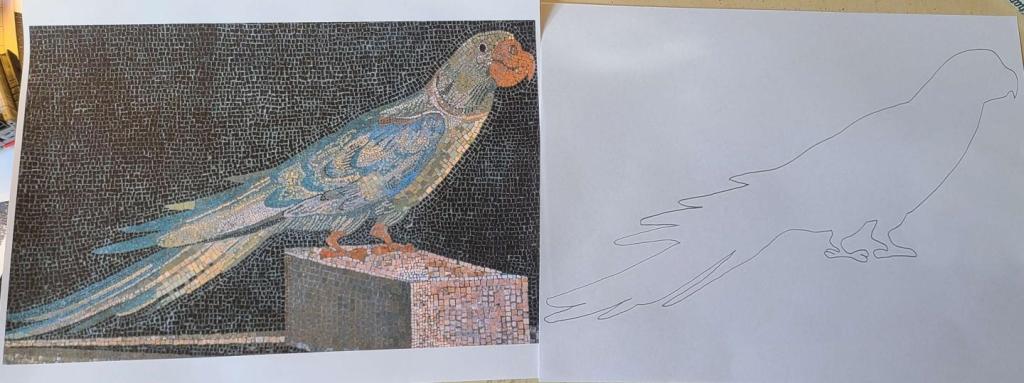
Producing a Parrot’s Portrait
By Vasilios Van de Verg
There are a few issues with my original plan.
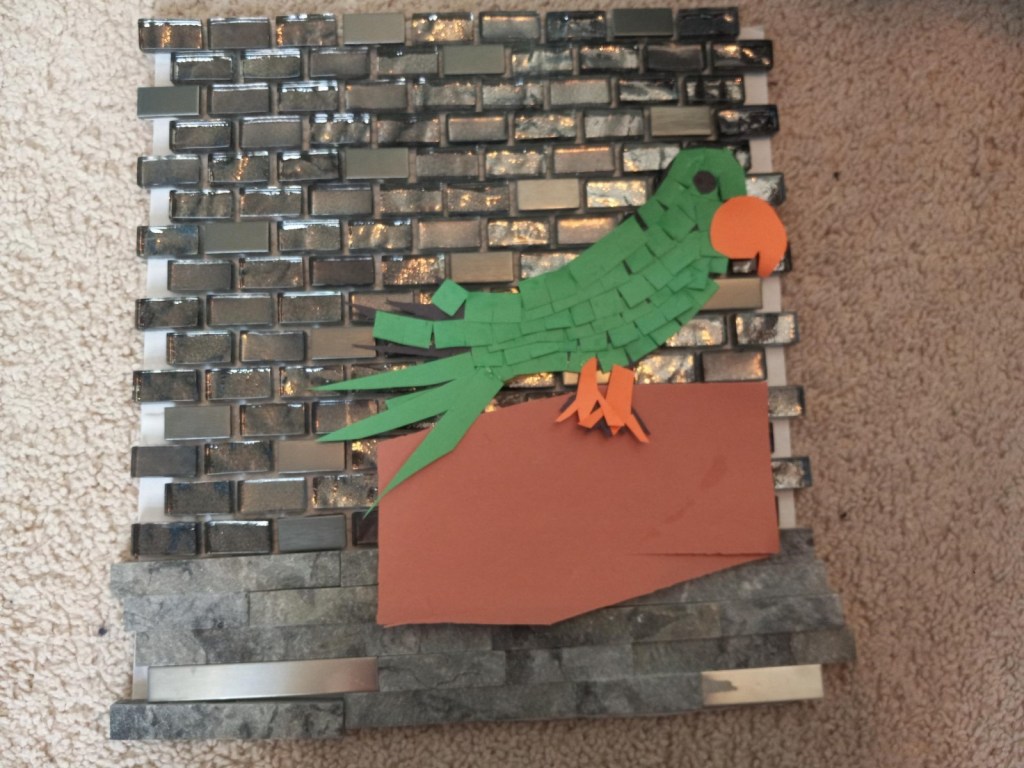
The first issue is that a square inch is a lot larger than I originally thought, and my mosaic would have to be massive in order to have any level of detail. I decided to make the paper tiles ½ inch by ½ inch instead. I would also have to find smaller ceramic tiles, which leads into the second issue. The second issue was that there were no white square ceramic tiles smaller than one square inch. I scratched the painting idea entirely and elected to just find tiles that looked like the original mosaic’s background.

I then removed some of the glass tiles and put three rows of the stone tiles in their place.

There is now a third issue: The bottom tiles are irregular in size, so it would be very difficult to add in the box that the parrot stands on using tiles. I decided instead to cut it out of paper. I was thinking about making it out of paper tiles, but since the shape I cut out was just a parallelogram, I felt that it would have been unnecessary and tedious.

I then made the base for the paper tiles by tracing an outline of the bird on black construction paper and cutting it out.
I then began to make the paper tiles. I made cuts in ½ inch wide strips of green construction paper every ½ an inch, leaving a small bit of paper still connected. I had trouble keeping the cuts clean and uniform, but I decided that it gave the tiles a feathered effect and did nothing to correct it.
I had a video of me cutting the paper strips but I can’t add videos to WordPress without getting the premium version.
I started attaching the paper tiles in rows along the paper silhouette of the bird. While I was doing this, I got the nagging feeling that maybe I was going about it the wrong way, and that it wasn’t going to be good. It certainly did not look good; the opus-vermiculatum effect only worked when the paper curved one way and when it was bent the other way the paper tiles would overlap each other (in hindsight I could have fixed this by removing the section of each strip that bent this way and flipping them, so they did not overlap). I pushed these thoughts aside and reassured myself that it only looked so bad because it was an unfinished project, and the final version.
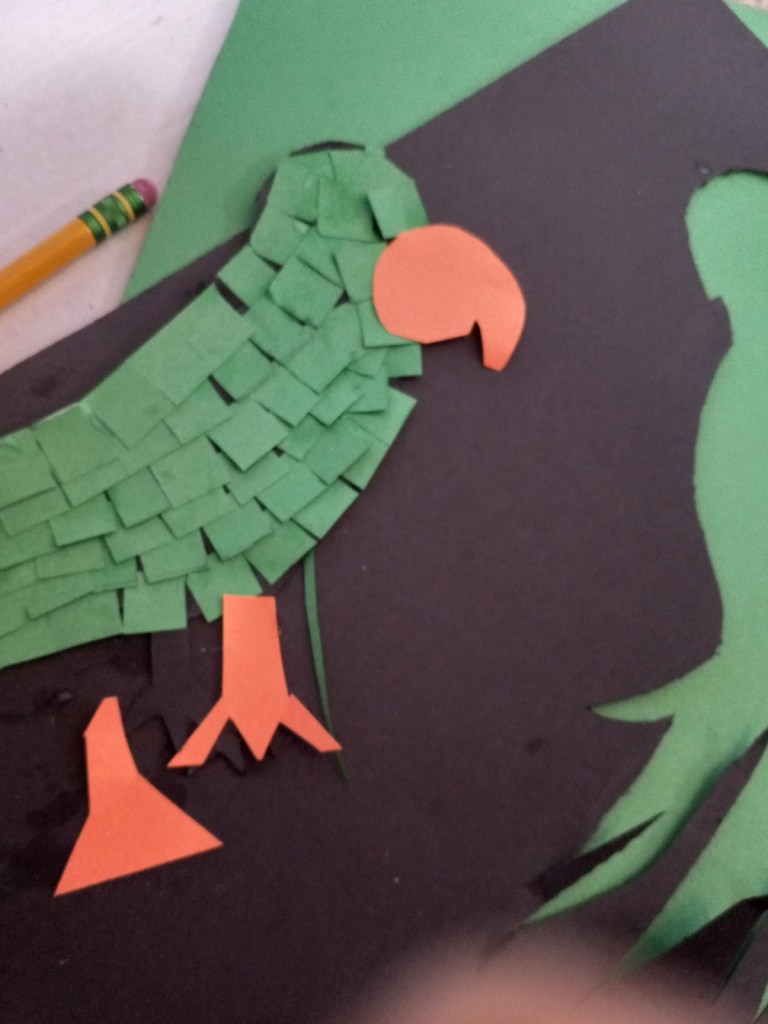
I also cut out a beak and feet for the bird, but I forgot to take a picture before that.
When the parrot was finished I realized I was correct in thinking it was not going well. I considered restarting, but I had already gone through the meticulous process of laying down a strip of paper, waiting for the glue to dry, washing off glue I got on my fingers, going back to add another strip only to realize the glue had not set and messing up the previous strip, and so on. I decided to leave it be, and only added a round cut of black paper for an eye. I then put the pieces together.
-
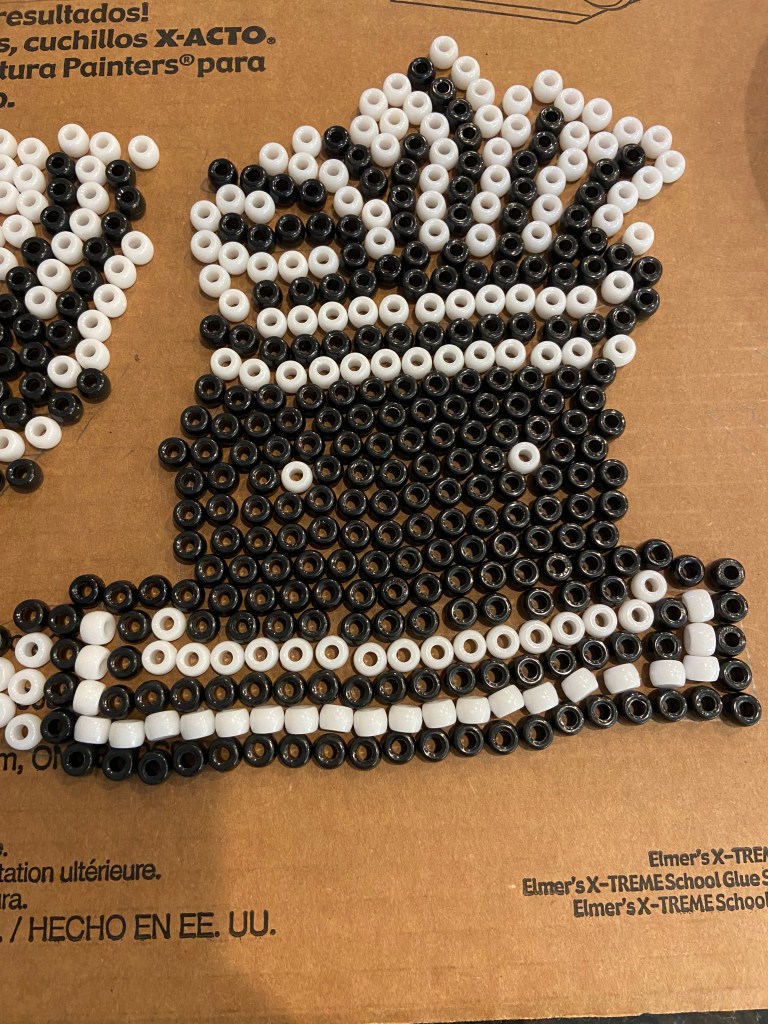
The Creation of my Mosaic
Braden Smearman
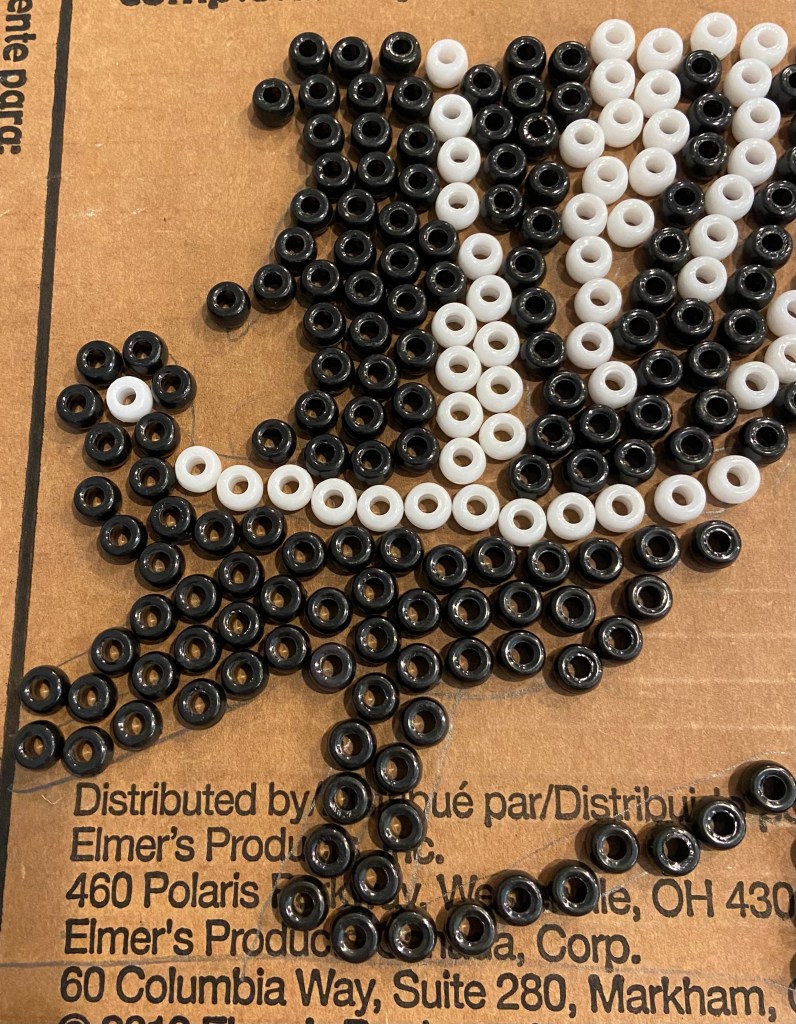
It was time to begin the recreation of an Ostia Antica mosaic. My first step was to find a piece of posterboard to construct the piece on, as I needed a flat surface. I then gathered my beads and began sorting to make it easier to grab a certain color bead. I sorted all of my white and black beads into two different bowls, which took a lot longer than expected. Once I finished sorting, I drew a blueprint for my mosaic. I depicted the outline of the actual mosaic as a basis for my creation. This took about thirty minutes, as I kept having to restart to accommodate for the size of the posterboard. I began to place the black beads in the correct spot to create the main objects in the mosaic. Since the mosaic was composed of three different images, I did one image at a time. I would place the black beads down, then place the white beads needed to create a border around the object. This helped keep the black beads in place. I repeated this step for the remaining two objects and finished the majority of the mosaic. I finished the art by placing the remainder of the white beads to fill in the background of the mosaic. While creating my mosaic, I ran into one main problem. I had to keep the beads from rolling away and keep them in place. This was difficult in parts especially, where I had to put them sideways to accommodate for size, as they would roll and bump other beads out of place. Also, when placing the white beads as the background, I would accidentally bump one bead to close to another and it would move every bead it touched. This caused some of the images to become disformed, making me fix the image all together. Although, this extended the process, I overcame the obstacle and finished the mosaic.

-
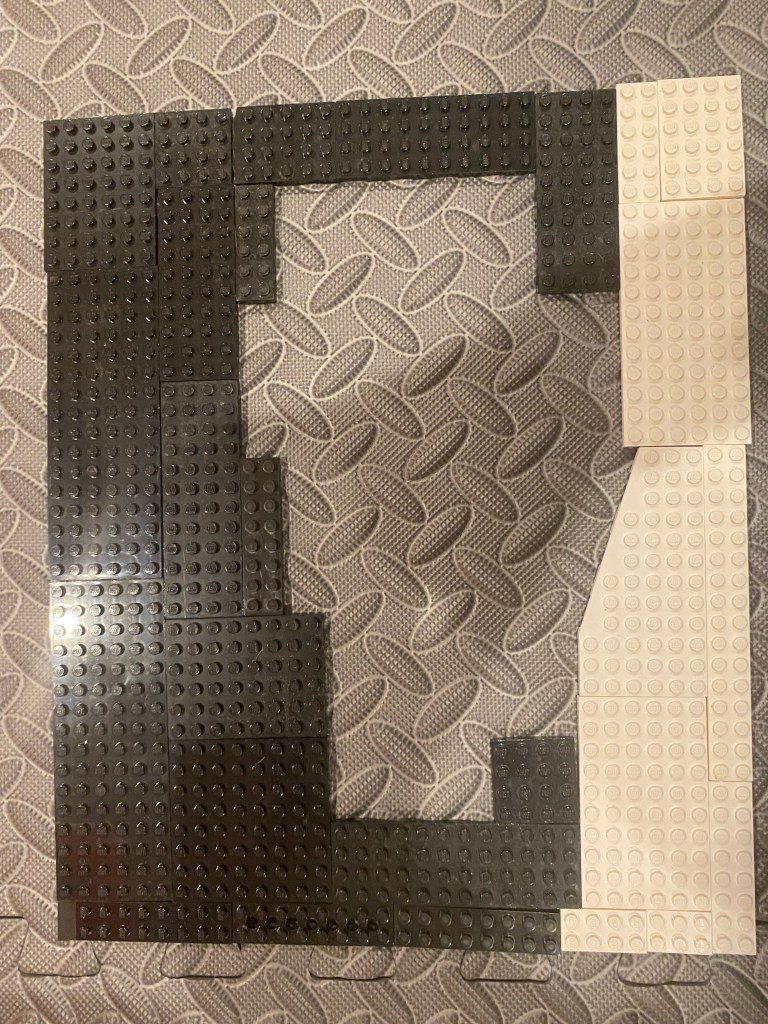
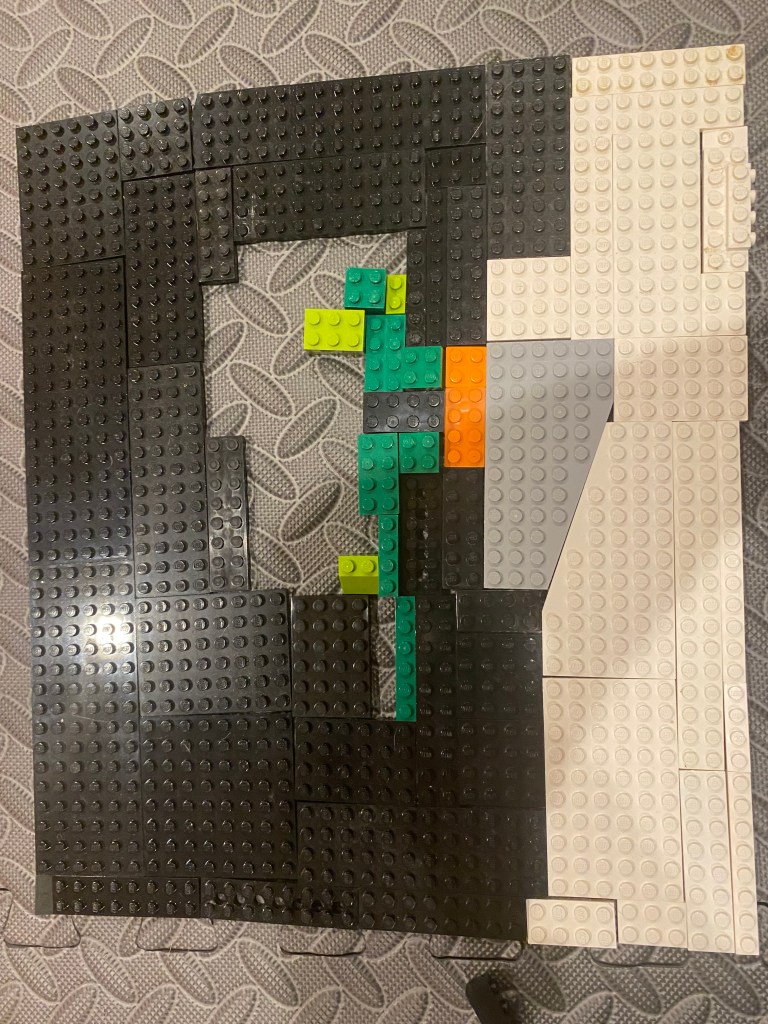
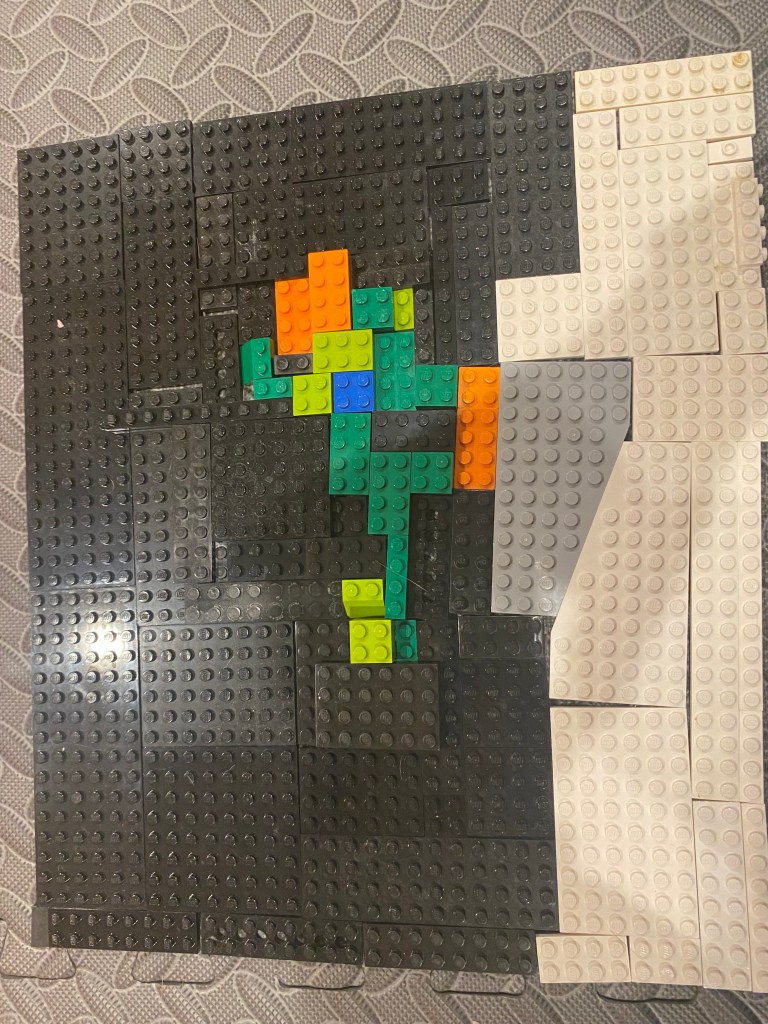
Parrot Pergamon: The Creation
Peter Bashore
The next portion of this project is taking the plans from my earlier post and putting it into action. As i quickley learned, however, actually creating this parrot mosaic is a completely different story from planning on creating it. As I am not an artist, I underestimated the severity, for lack of better wording, of these challenges while creating the parrot mosaic. The Lego pieces moved around a lot more than I initially anticipated, and this resulted in some gaps between pieces. It also made it harder to keep the square shape of the original mosaic, and this is clearly visible in the pictures I have below. It was not uncommon for me to get frustrated with the Legos and the gaps between them and remove an entire section to do it all over. Trying to get a clearer depiction of the parrot using Legos was also a lot harder than I thought it would be. It looks like a pixel-art version of a parrot because of the stubs that stick out on Lego bricks. As I worked, it became more and more difficult to place pieces in the correct place due to the small size of the Lego bricks. Often when I would try to place a small brick, such as a 2×2 or 1×2 brick, into a small gap, i would end up nudging another group of pieces. This was the main cause of my frustration. Not only was putting the Legos into the small spaces a challenge, but finding the pieces that actually fit inside of those gaps was a whole other ordeal. While I did end up finding enough pieces, I spent about 30 minutes sifting through bins just to find the correct size and color Lego piece to place down. The recreation of the Parrot Pergamon mosaic took me about 2 hours, although with the removal of my frustrations and taking apart entire the entire thing this could likely be cut in half.

-
The Recreation
Evan Rodgers
To re-create the Pergamon Hellenistic Mosaic, the first task that I needed to accomplish was tracing the outline of the parrot. In order to do this, I printed out a picture of the mosaic and taped it to a window through which the sun was brightly shining. I then took another blank sheet and taped this new sheet on top of the printed mosaic. This created a natural light that I could use to help facilitate my replication.
My second step was to cut the construction paper. My original plan was to cut the paper so that they would resemble the original shapes of the mosaic. However, after drawing a few of the shapes, I realized that most of them are extremely irregular. Along with this problem, the size of some of the original pieces were incredibly small, meaning it would make my interpretation of the mosaic very messy. So, instead, I decided to do simple squares instead of complex shapes. Another challenge I soon encountered was the meticulous process of individually gluing each piece to my retracing of the parrot. Instead, I opted to place glue in patches of the same of the same color. Then, I would take a bunch of squares of the same needed color and scatter them on the glue. After that, with a cotton swab, I would then arrange the pieces in the mosaic to properly preserve space to make it appear more like the original mosaic.
As I was constructing my mosaic, I took inspiration from the Vincent Van Gogh painting, as pictured below. This image was taken from the Vincent Van Gogh Experience, in Washington D.C.

Looking at the image, I took notice of the blending of the colors yellow, green, and blue. These colors are very similar to those that comprise the plumage of the parrot in the original mosaic. Moreover, the black background captured in the snapshot calls to mind the shading around the parrot in that piece, as well.
While constructing the replication, I realized that my method was still rather tedious, but I still believed that this was the best way that I could conceive of properly recreating the mosaic. Eventually, I realized that having a tool with a point might help me to move the pieces of paper in the glue more easily than the blunt cotton swab, so I tried and successfully used wooden skewers for increased precision. Overall, the process was at times painstaking, but was efficient in the end.
-
The Gameplan
Evan Rodgers
Most of my interpretation of the Pergamon Hellenistic Mosaic will be created out of paper. Most, if not all, of the paper will be construction paper. Most ancient mosaics were comprised of tiles fashioned from colored glass or stones; however, I will use construction paper instead because it is cheaper to obtain than these original materials, and I currently have an abundance of the substance on hand. It will be created in the work office of my house. I am currently not expecting the reproduction to be reconstructed in any other part of the building.
The main aspects of the mosaic that I want to recreate are the pose of the parrot, the shape of the individual components, and the general colors of the picture. My first step is to draw the basic outline of the parrot. Second, I will render the details inside the outline, such as the eyes, the talons, and the individual feathers. Next, I would erase and redraw lines to better resemble the tiles used in the original artwork. Once the shapes resemble those of their predecessor, I will color the tiles accordingly. After all these steps, I would have the blueprint of my recreation of the original Pergamon Hellenistic Mosaic. I would then begin the process of creating my replication by tracing the squares of different sizes on green construction paper. Once I have my array of squares complete, I will then cut them out. I will do this several times on construction paper of other colors such as red, yellow, blue, orange, and black. With this task done, I will then lay out the squares in accordance with the colors and position of the original mosaic. Finally, with the general position of paper squares figured out, I will glue the pieces to their corresponding location until the mosaic is fully glued and completed.
The main problem I foresee is that cutting and gluing the paper will be a tedious task. I will attempt to incorporate influences from pixel art techniques, such as anti-aliasing. Anti-aliasing is the technique of using a darker version of the main color as a transition between the inside of an image and the outline. It is used to create less stress on the viewer’s eyes during this conversion. I would use this skill since the art of creating a mosaic is very similar to the process of making pixel art.
I found inspiration the grandeur in the uncovered ancient work below.

Extraordinary Roman Mosaic and Villa Complex Discovered Beneath Farmer’s Field in England
Ultimately, I want my audience to understand that they can generate great art by keeping a design simple. When examining the original Pergamon Hellenistic Mosaic, one can see examples of miniscule tiles in areas of the wings, neck, and beak. By comparing these areas to my future rendition, I hope the audience can see how I turned a complicated masterpiece into a much simplier yet just as powerful piece of art.
-
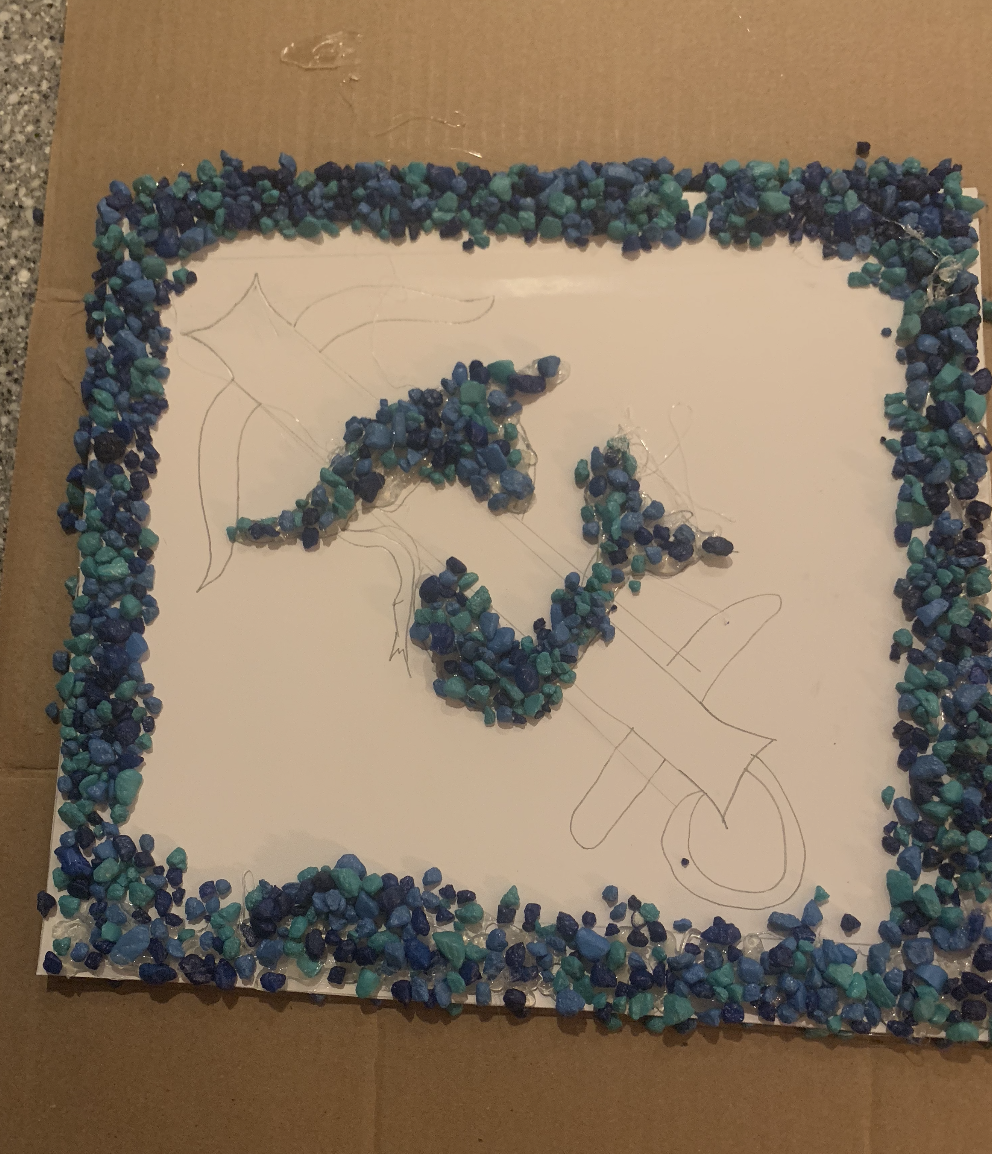
Posavec: Parrot Progression
Through creating this mosaic I have learned that I am extremely bad at working with small pieces of paper. Originally I planned on using very small squares of paper to recreate the style of opus vermiculatum that it was originally created in. However, this plan fell apart, literally and figuratively, very quickly as I blew on the paper three separate times each resulting in a complete restart. So I settled on sacrificing some historical accuracy in order to keep my sanity along with making it look decent.
After failing multiple times and having many messes of glue and paper I made the controversial decision of not using glue. This proved to be a double-edged sword as on one hand it made rearranging very simple, but also required me to be deathly careful in handling it.
Keeping with the theme of my original plans being shattered, I was going to print a picture of the parrot and simply align the pieces over it. This was ruined when I realized I could not print the picture to be big enough and the color on my printer was not working. So I instead attempted to recreate the mosaic freehand which proved to be quite difficult as I am an inept artist. Despite my lack of artistic skills, I think the outline turned out pretty well and was good enough.
I then began to try to figure out the basic shapes of the drawing such as the ends of the tail which were easy to cut. Working from the outline of the bird inwards made finding usable pieces much simpler.
Accurately displaying some of the colors such as the ones on the box was slightly difficult as I was limited in choices for colored paper. The parrot was probably the easiest part for color matching but the most difficult for arrangement.
The box and shadow were the last two things I did and will be saving the background and floor for the final product’s blog post.


-
The Progression of My Ostia Antica Mosaic Recreation
Matthias Pridgeon
The recreation of the Ostia Antica mosaic has been a tiresome but rewarding process that has required, more than anything else, an extreme level of diligence. Though much of my progression on this project has not necessitated much prerequisite skill, each step has mandated extreme patience and accuracy.
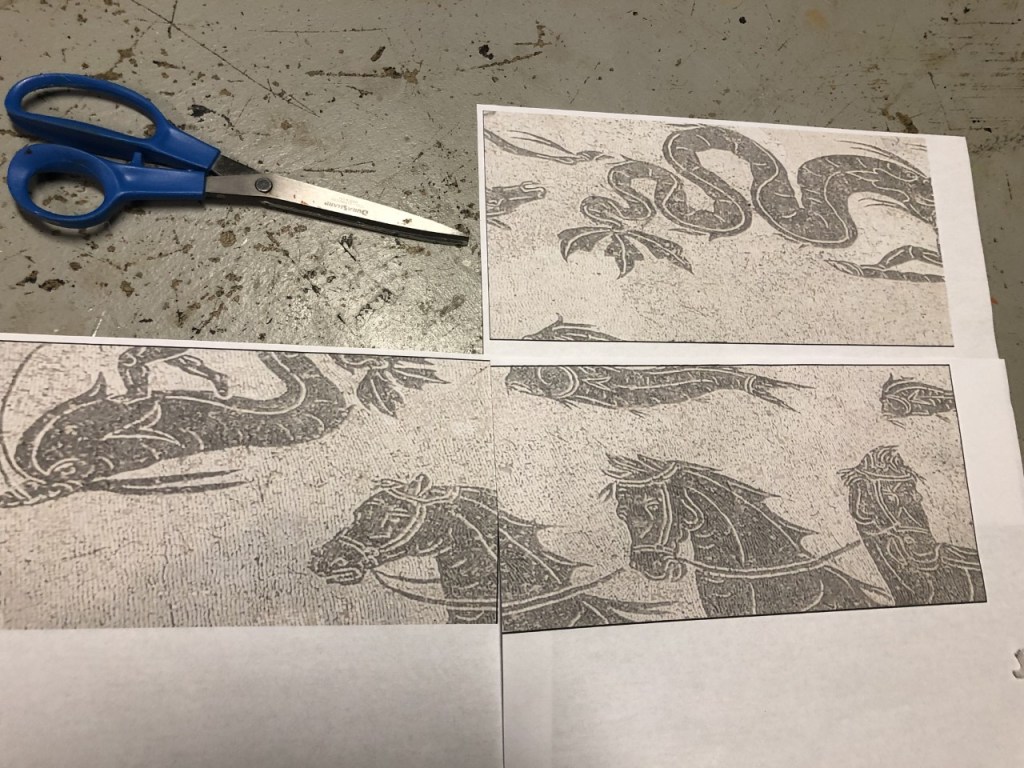
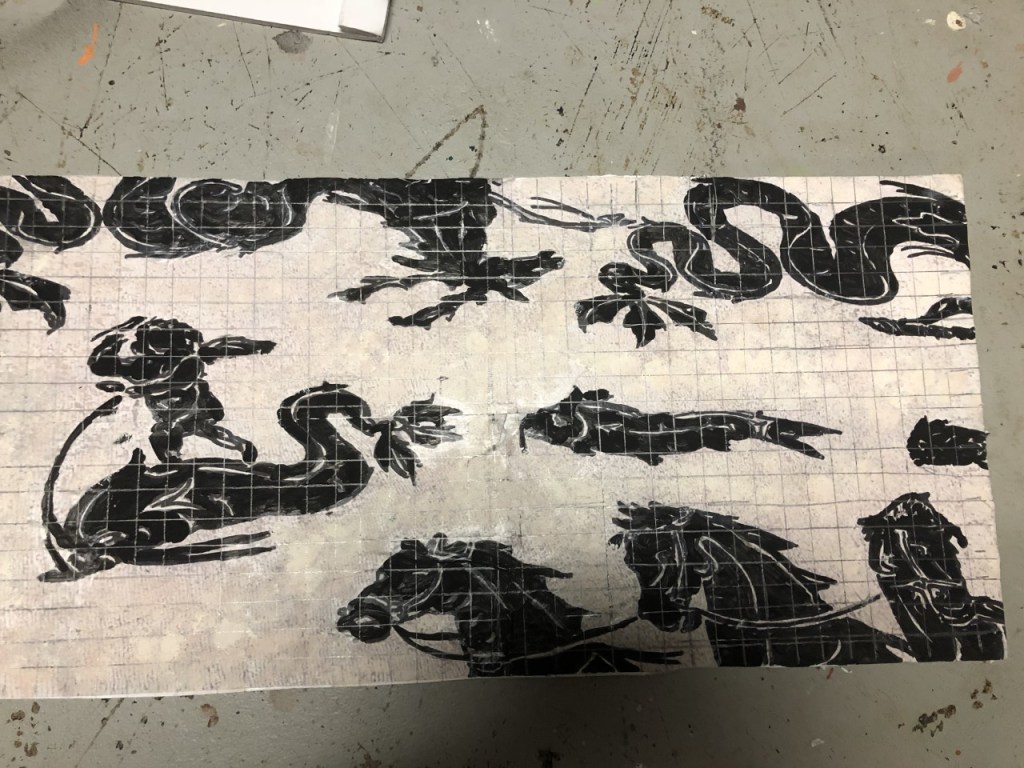
The first step I took in my progression was selecting the specific area of the panoramic Ostia Antica mosaic to recreate. Though in an ideal world the entire mosaic would be recreated, I felt to guarantee the highest quality it was best to select an area which contained enough elements to maintain the maritime spirit of the mural, while still remaining plausible for me to accurately recreate. The photo below is a screenshot of this chosen area.

Once I selected this area, I considered the skill I wished to work at. I eventually concluded I wanted something a little more than twice as wide as it was tall, and added a grid over top the screenshot which divided the image into four quadrants that maintained this scaling idea. I then individually screenshotted each of the four quadrants, and printed each out on a separate piece of paper. Then, I cut the images out, and laid them on the ground in proper formation.
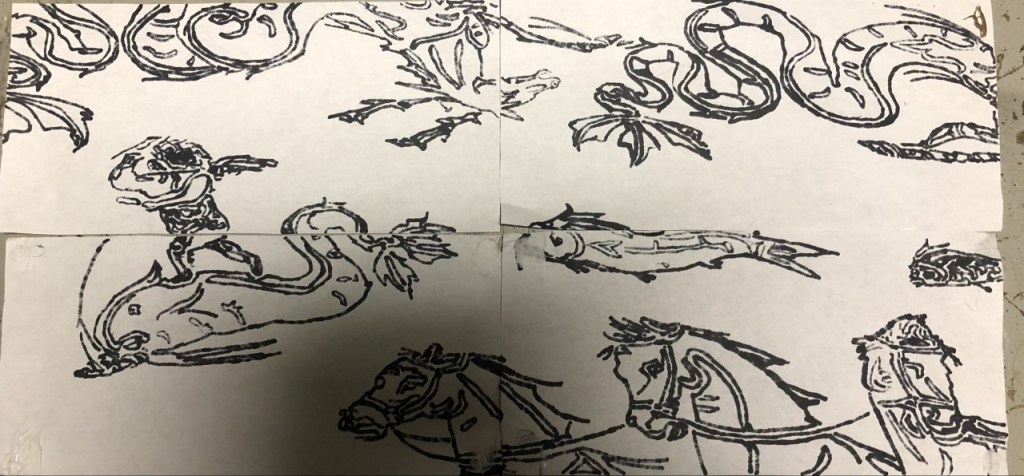
I then took a black Sharpie and traced the outside of the dark areas in the printed out mosaic pieces. This was to make the future process of painting easier, as the lines were more clearly defined and easier to follow. The bled-through, sharpied pages are pictured below. Following the images’ tracing, I began the most difficult portion of the project.
I began to recreate the image’s ebony portions with a pitch-black paint, careful to avoid the filigrees and stripes done in white. This took quite a while, but after a while, was complete with surprising accuracy. After a few touchups, I turned toward the background, which I wanted to paint to integrate it to the style of the figures. I did my best to recreate the color of the background in the original image by applying a black wash, and, once that had dried, stippling on a crème color. Below is the painted version, though this photo still lacks the later touch-ups. As I finished the painting process, I mixed a concoction of Elmer’s glue and modge-podge, which I applied liberally to the back of my traced papers and to the white foam board to which they were mounted.

My last major step was to give the recreation a mosaic-tile feel. To achieve this effect, I tracked many, many squares onto the mosaic recreation with a pencil. I then used a box cutter to cut these lines, being careful not to press hard enough to penetrate the foam board all the way through, as to maintain a somewhat rigid structure which held the tiles in place without removing the tiling effect. Below is the mosaic reacreation with the pencil lines traced.
Now that I have finished cutting, the mosaic is nearly completed. All that remains is a few final touchups to the paint, a slight widening of the gaps between tiles to accentuate the tiled effect, and a sealant coat to keep the painting intact. Below is the nearly finished product.

-
Parrot in Progress (Aaron Caddick)

Now that everything’s laid out, it’s the time to get started in creation.
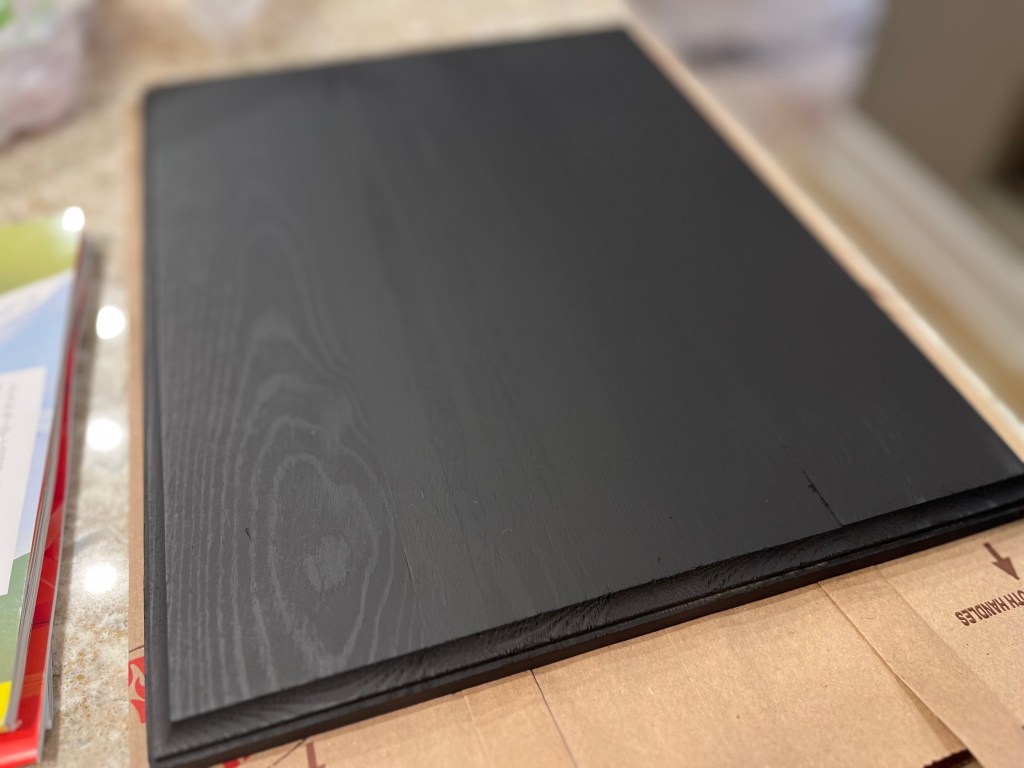
Though I had a lot of planning, there were some things that I had to adjust for; the first of these being the base. Instead of a dark piece of 18×24 wood, I decided to shrink it for the sake of resource sustainability to a size of 11×14. Along with that, the wood was of a lighter color so I decided to spray paint it black to compensate.
I then started to lay out resources and do some brainstorming on the approach I would take in order to layout everything I had to do to expedite this project’s creation. I used highlighters to mark out the pieces of metal that I would then cut out and then separate the metal once bound to the board.

(Left) The board I would use in order to hold the mosaic.
(Right) A decently separated piece of metal, with smooth edges and relatively good symmetry.As for the coloring and metal, that all went to plan. I decided to use foil instead of sheets as I found it to be more flexible and is easier to morph. Despite the convenience of the foil, it still had it’s downsides. For one, getting a clean cut was certainly a challenge. I had to continuously made small scratches at it while attempting to separate pieces for the mosaic. Another challenge was screwing the pieces in at just the right depth, and hoping that they wouldn’t separate or crumble.


(Left) The edge of the foil wasn’t as smooth as intended; it proved difficult to get it to the point I wanted it to be.
(Right) My original lining that I would attempt to smoothly cut out.On the other hand, there were certainly parts of the creation that proved to be a lot easier in nature in comparison to the challenges that popped up. For example, the coloring. I had purchased red, yellow, green, blue, black, and white paint which were not only easy, but fun to work with in order to match the hues seen on the mosaic, in a more vibrant manner. Also, the board was perfect for the screws, as they went in seamlessly, and were tightly held in.
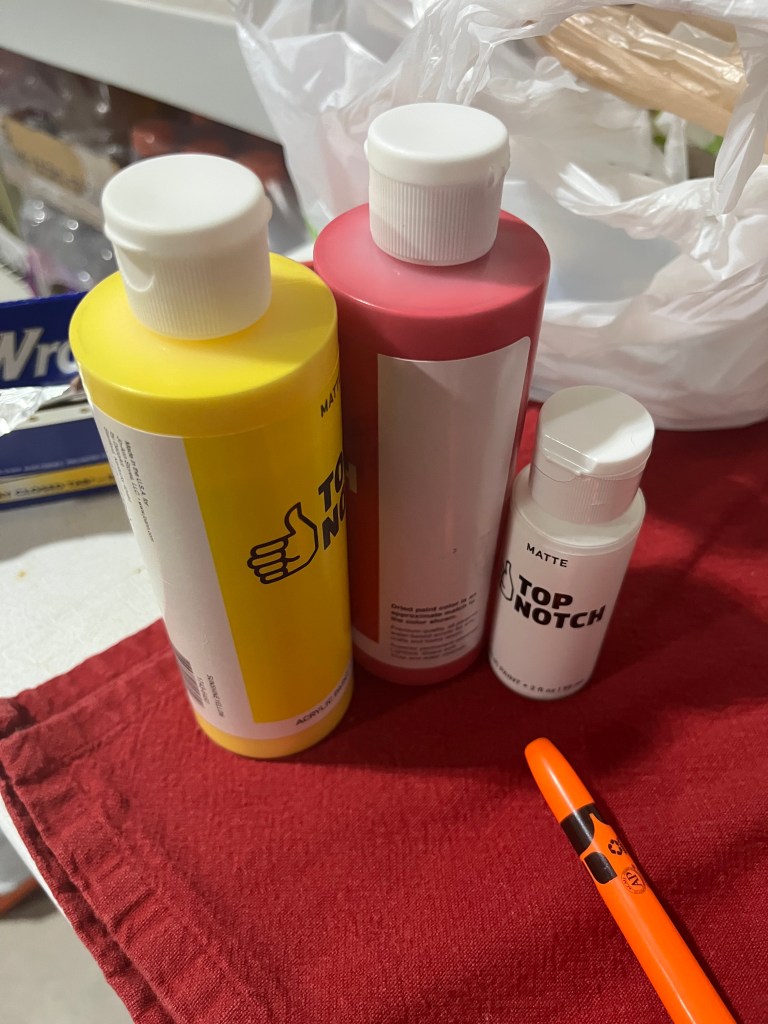

(Left) Some of the colors I bought, more specifically red, yellow, and white all in a matte finish.
(Right) Those same three colors being used to mix into a hue that matched the flooring presented in the mosaic.For the safety of the mosaic’s composition, as well as to stay true to traditional formations of these arts, I decided to add a bit of adhesive. Since I was working with a paper-like version of metal, I thought that hot-glue would be a great contender to held keep the pieces together yet visually separates, while they were still bound to the board by the screws.
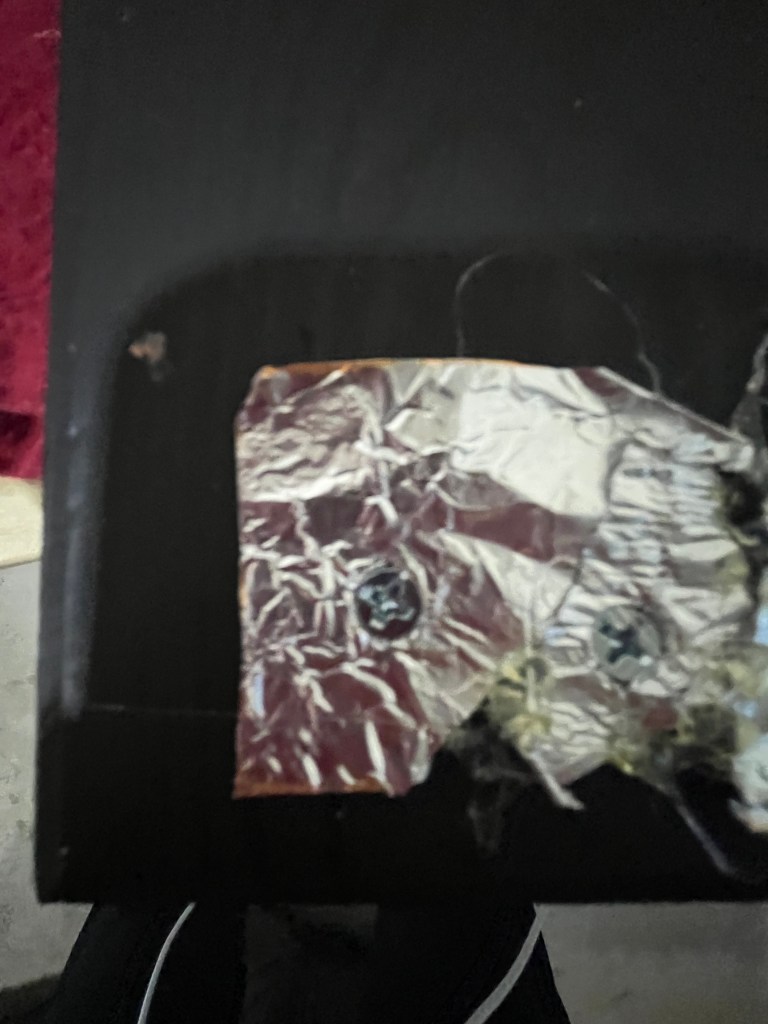
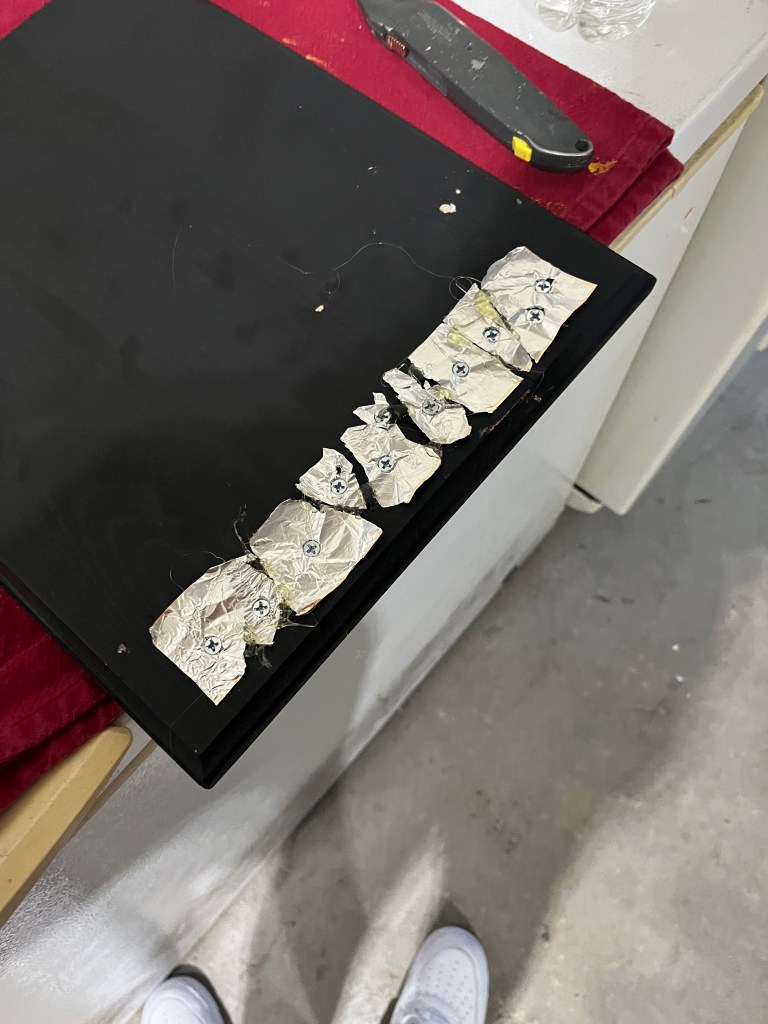
(Left) A close up of the metal, bound to the board by screws and held together with other metal by adhesive.
(Right) A more wide shot of the project, with the bigger pieces held together by glue before the pieces were torn into smaller pieces.All in all, I feel that the beginning of my production has had its ups and downs. Nevertheless, I’m certain that the ending to this creation will be a beautiful one, one in which the hard work put in is paid off.


-
Subscribe
Subscribed
Already have a WordPress.com account? Log in now.
