-
The Finished Product
Ben Cuomo
Starting off, I’d like to make it known that I am not the greatest artist, however I tried my best and this is what I got. During the process of creating my recreation I didn’t face any challenges, however I did vary off my original plan of attack quite substantially. Instead of using poster board, I went into my garage and took an amazon box. I then broke it down and got the base on which my mosaic would be created. Then, the first thing I did was draw an outline. This was to make the process go smoother for me and also to try and stay as close as possible to the original mosaic.

The Outline of my Dolphin I used a black sharpie to create the borders and then created the lines inside that you see as guidelines to where I would place my white. Also visible in this picture is craft foam surrounding the tail, originally, I was planning on sectioning off areas with foam to make the items I’m using stay, but it wasn’t working how I expected, so I just decided to go for it and not using anything to adhere the “tiles” down. I knew that was a risk but luckily nothing bad happened in the end.
The next step in my process was laying down the black beads. Originally, I was planning on using grey but when I looked at the image again, I saw a darker grey, and the only grey beads I could find was a light grey so I decided that black beads would work better.

The dolphin with all the black beads first I laid down all the black beads first for one simple reason, the white ones hadn’t come in yet, and unfortunately, they weren’t going to make it in time. Because of this I had to adapt and decided to use rice. At first it may seem like rice would be much harder to use than beads, however as I started to lay it down, I realized I could just sprinkle rice in between the beads that were already down. This realization vastly cut down the time it took and, in my opinion, also helped with the look of the mosaic. My next step was adding red lentils. This was nowhere in my original plan, however when looking at the mosaic again I noticed a red outline around the nose and fin of the dolphin. These were hard to lay down due to the size but in the end, I think the addition of them definitely helped.
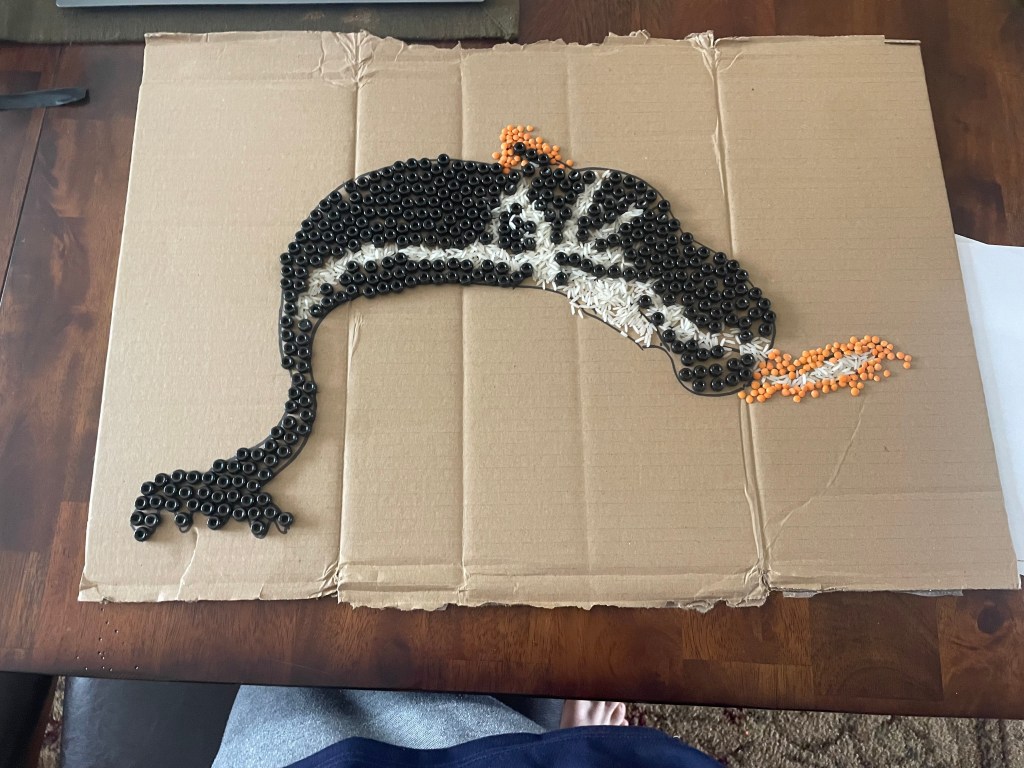
The “First Draft” This was my original finished product, however after looking at it I realized that it resembled more as a whale than as a dolphin. Due to this I added some more black beads and came up with this:
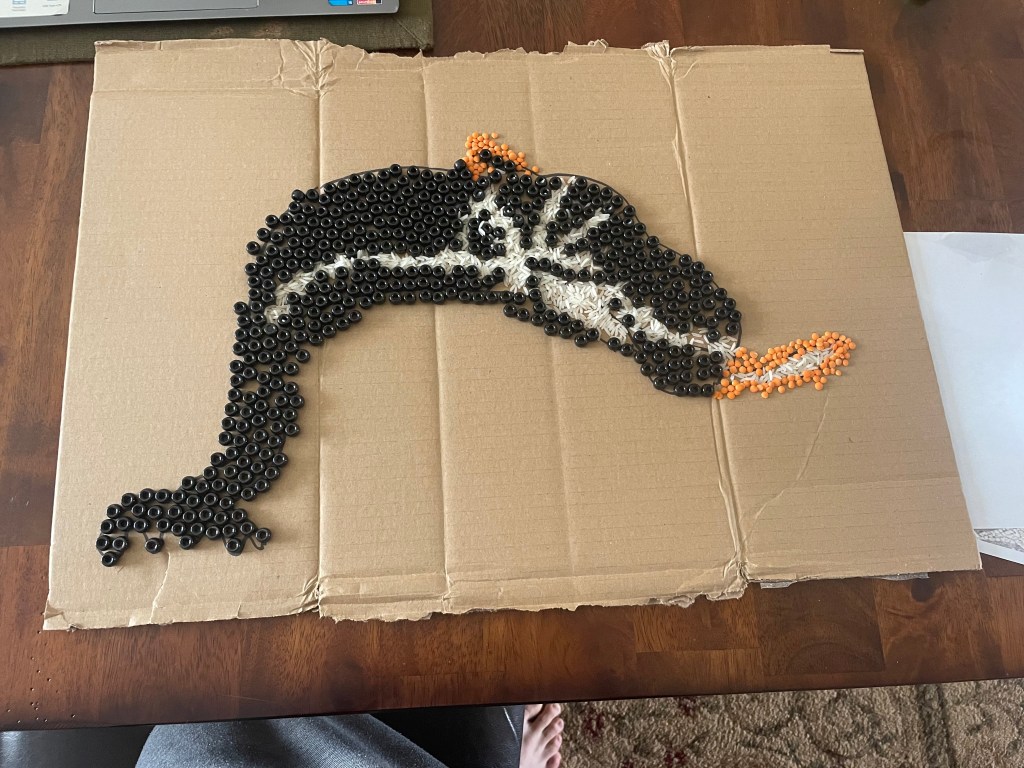
The Finished Product Overall, I don’t think this is a perfect recreation, and looking back I probably would have tried and found a darker grey thing to use in place of the black beads. However, I gave it my best shot and in the end am happy with what I came up with.
-
Beans Bonanza!
Peter Kelly 10/29/2022
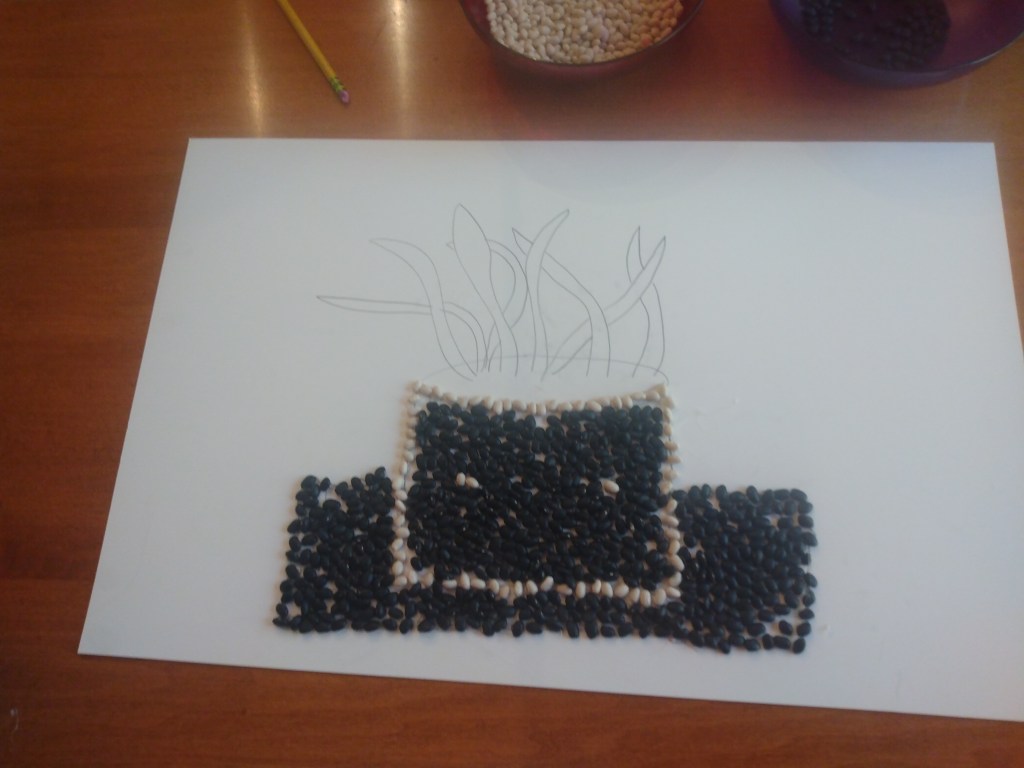
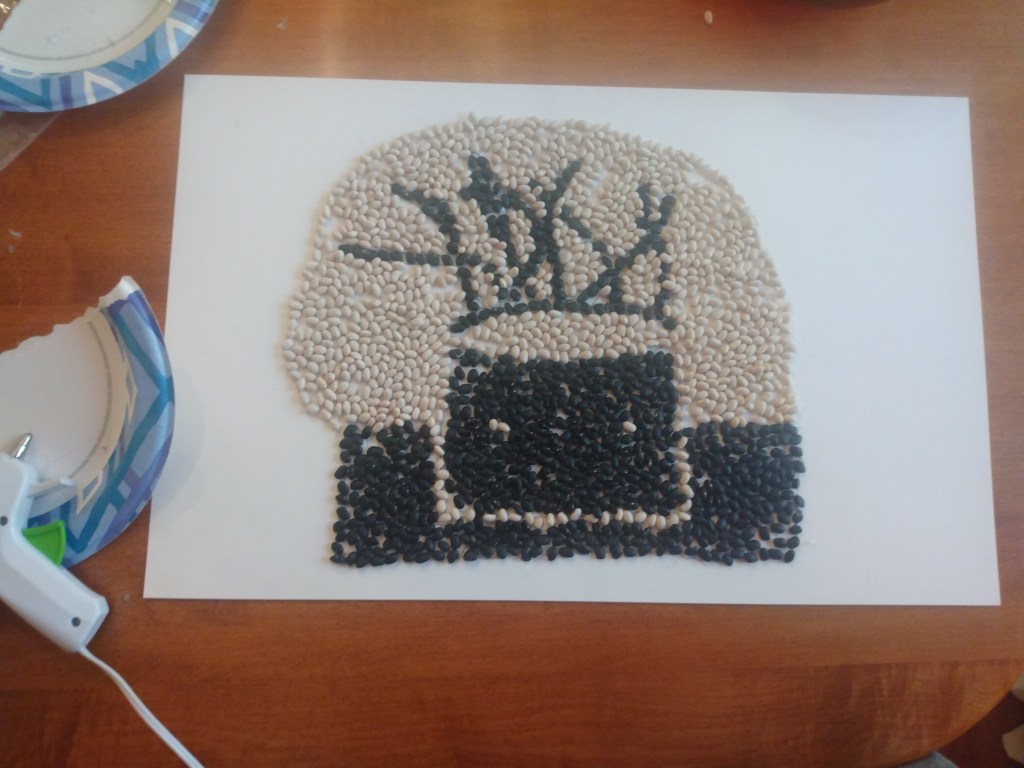
I have finished my mosaic. The way I went about doing this was I first drew my outline with a pencil. I originally planned to do a boat, but I realized that doing the fire would be easier because it has more straight edges. After I drew the base, I began to hot-glue the beans down. I quickly realized that I couldn’t wait too long after gluing, because the glue would harden and not be sticky anymore. I also found out that I couldn’t do too long of a section at a time, since it took some precision to stick each bean onto the glue without burning myself (which ended up happening 11 times), so I had to do short spurts and be careful about the precision. One of the challenges was using hot glue. I had never really used hot glue before today, and one thing that annoyed me the whole time was the strings that kept coming off of the poster board and beans after I stopped gluing. They got everywhere, including on my clothes and on the floor. What I did is I glued beans down for edges of a section, so as to create a barricade. I then dumped beans into the well created by the edges, so much of the beans are not glued to the posterboard. This made it easier to fill large sections at a time. I tried to make it look similar to the flame depicted in the mosaic by making the grey sections black beans and the white sections navy beans. This project took me about an hour and a half in total, with most of that time spent on gluing each individual bean down of the barricade. I feel pretty good about how it looks, because I can definitely tell that it is similar to the mosaic.


15 minute video of me gluing beans. If it seems boring, imagine how I felt. -
Creation of Parrot Mosaic
By Brendan Sipes
To recreate the Parrot Pergamon mosaic, I plan on cutting small pieces of different colored construction paper and gluing them together on a separate sheet of labeled paper. To start, I would trace the mosaic onto my sheet of paper. After tracing the outline of the mosaic, I would then draw lines inside the parrot to divide where certain color construction paper will go. This would make filling in the mosaic similar to a color by number drawing and make working much more efficient than having to constantly be looking at the small image online while cutting. After, I finish drawing and labeling the parrot, I will begin cutting and gluing down the construction paper to form the parrot. After I finish, constructing the parrot, I will then finish by filling in the background.

Style of mosaic I will be making. I have chosen to make my mosaic out of construction paper because it is very accessible to me and can be easily shaped into specific pieces that I want. I am anticipating that the most challenging part about using this method will be cutting the paper into the right shapes and sizes. Making sure a piece fits into its place without overlapping or covering up other pieces may be tricky and could become tedious and frustrating.
The main aspect of the mosaic that I will be focusing on in my recreation will be the color and shape. The reason I am focusing on these aspects of the mosaic is because I want my audience to be able to see my mosaic and be able to easily identify it as a near copy of the original work. If I only cared about one aspect from the original mosaic such as, the color or using the same materials, I could easily come up with an unrecognizable blob that has no resemblance to the original work.

-
The Creation of My “Baths of Neptune”
I plan to recreate the “Baths of Neptune” mosaic from the ancient bathhouses of Ostia Antica by using black construction paper pasted onto a large white posterboard. The reason for this is that it is cost effective, relatively easy to do, and gets the job done as well as any other way. I will build it either in my room or on the dining room table, as not much space is required to do it. As for what I am actually redesigning, I chose to focus on one of the many fish portrayed in the original mosaic. The entire initial piece takes up an entire, so I chose to target one detailed spot. The artwork is made mainly of two colors, black and white, so those are the colors my paper and posterboard with be. The fish itself is black swimming in white background, so I am going to replicate that. I will start by drawing the actual fish on the poster boarded, then gluing the black paper onto it inside the lines. The only true problems I anticipate is that my drawing will be lacking in the skill and detail of the genuine tessellation. While I will never be as good as the artist from the past who created it, I can only hope to make something that is half as good as what he or she created. I wish that my audience will be able to see my mosaic and understood not only what it is, but the significance of it. Because the Romans were so well developed for their time, they had resources to make this beautiful art, and it is all related to their culture. The value of the sea in the history of Ostia Antica is present in the creativity and skill of the artwork. The attached video below shows nearly exactly how I intend to build my copy and will be great reference for when I start formulating it. How to Make a Paper Mosaic
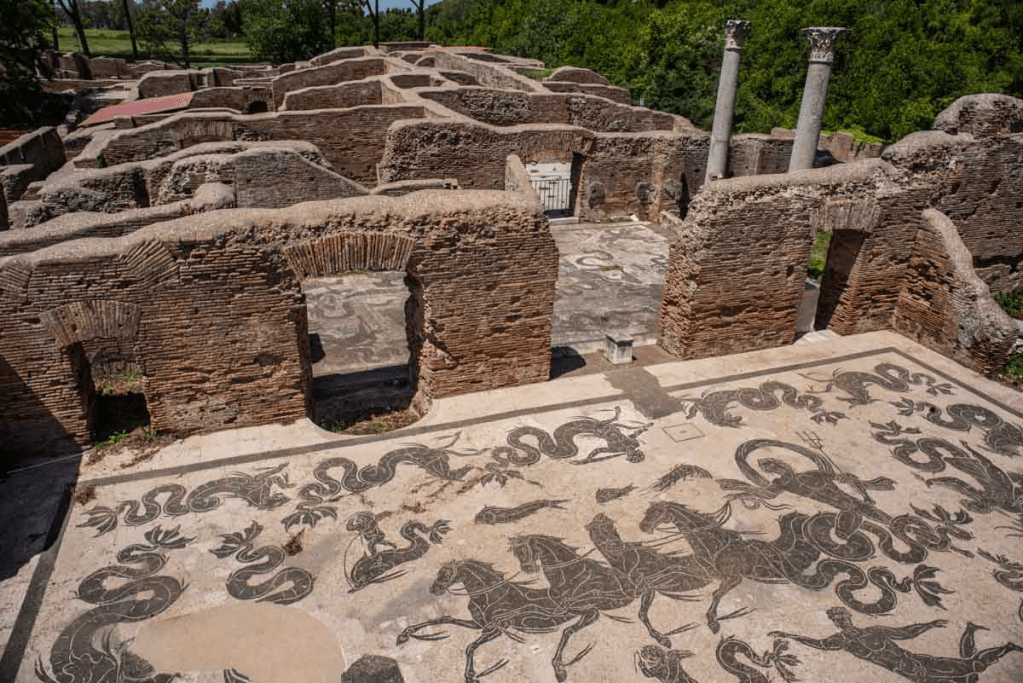
“Baths of Neptune” full site -Christopher Geldmacher
-
My Mosaic Creation Plan
By Eric Meyer
I plan to create the Parrot Pergamon mosaic by painting the image on a large piece of paper with acrylic paint. After I finish painting, I will cut up the painting into small pieces, then glue each small piece of paper onto the larger one, making it match up to the original image. The materials I will need are a large piece of white paper, a large piece of black paper, a variety of colors of acrylic paint, a paintbrush, scissors, and glue.
I chose this technique because it almost does not require any materials that I do not already own. It is also not a very difficult process because the colors are already painted and set up to match up together. I will build the mosaic in my dining room because there is a big table where there is lots of room to work. I plan to focus on the original painting the most because it is the foundation for the entire mosaic. I need to make sure each color and shape of the painting is accurate.
I anticipate a couple of different problems when recreating the Parrot Pergamon mosaic. The first is painting the mosaic because I am not very experienced with painting. Another problem may be cutting the shapes out in a way and placing them in a way that is fluid a looks nice.
I hope my audience can see the similarities between my mosaic and the original piece, but also the unique aspects of its differences. My sisters, who love to paint and create artwork, have influenced me with this piece, as we have their paintings, several of animals, framed throughout our home. I have always admired their talent and ability to create artistically, and hope I can do the parrot justice!
Here is a link to a video of an artist using a similar technique to the one I’m planning, https://youtu.be/3yQ4yQOyPrk.
-
Planning a Parrot Portrait
By Vasilios Van de Verg
The background of my mosaic will be made out of ceramic and glass tiles. I specifically intend to use the tiles that come in sheets and are used in walls of houses. I have assisted my mother in renovating several homes, and I worked with these small tiles and noticed their simple colors and designs. Remembering this, I realized they would be perfect for the background of my mosaic. Because it is made from heavy material, it will be hard to transport, so I will just make it on the floor, and dismantle it when I am finished. Since the background is very simple, it would be a lot easier (and cheaper!) to get tiles of similar color to the background in sheets. I will attach them to each other to create the background. The Parrot in my mosaic will be made out of strips of paper, which have uniformly spaced cuts in them, which nearly separate the strip. This will allow it to bend slightly while still having distinct tiles. My hope is that the curved strips will have a similar effect as the curved rows of tiles in opera vermiculatum, and make the bird distinct from the rest of the mosaic. Additionally, I will only glue the connected side to the background, and let the strips overlap, to make a sort of feather effect. My plan for the parrot was inspired by the video linked below, during my viewing of which I noticed that there was a small part of each tile in a row, no matter how curved, that was in contact with another tile.
There are a few complications with my plan, most of which have only occurred to me as a write this. The first is that, even though I plan to make the paper tiles one square inch each, due to the curving of the rows, the tiles of the bird won’t match with the background tiles, while still being in direct contact with them. I will remedy this the same way the artist of the original mosaic did; by adding a border between the Parrot and its surroundings. However, while their border is made of curved individual tiles, it would be difficult to implement this, as I would have to make a curved line of ceramic tiles and ruin the beautiful periodic geometry of the background, or add paper tiles around the bird, which would not really solve the problem. Instead, I will attach the paper tiles to a black sheet of construction paper, and cut out the parrot, leaving a half-inch of black paper around the bird, and then I will attach it to the ceramic background. This idea was inspired by an art project I did in 7th grade, where I had to first paint an undersea background, and then had to cut out drawings of sea life that I had made, and glued them to the background. My intention is that by making the background and the parrot out of separate materials, and then adding another dimension by letting the parrot be closer to the viewer, the parrot will appear distinct and somewhat out-of-place.
Video: Opus Vermiculatum – Ancient Placement Techniques of Mosaic Stones
-
Posavec: How I am Going to Recreate the Parrot Pergamon
In order to recreate my mosaic I will start by taking a piece of white paper and sketching the mosaic. After the sketch is complete I will draw lines in the lines where I want the small paper pieces to be. My mosaic will be composed of more jagged and various-shaped paper pieces as opposed to the original mosaics’ small squares. However, I want to still accurately portray the image so I will try to avoid using very vibrant colors as it would be very difficult to do so with the original material. I will be using mostly natural, dull colors surrounded by a dark background to make it seem more colorful toward the middle which is where the parrot will be.
I will be using construction paper as I think it will be a fairly easy option and make portraying the original image more accurate. I also feel it is the optimal way to make more jagged pieces as I can cut and recut them however I would like. The whole reason I am using these differently shaped pieces is to maintain the original mosaic’s meaning to the best of my ability but also attempt to mix it up.
The only real challenge I am anticipating is how I am going to cut the paper according to how I drew them. I am thinking of overcoming this challenge by drawing the way I want to cut it on the paper I’m cutting. The only problem with this is that it would make it more difficult to use a variety of colors as I would have to redraw the outlines on every color paper I want to use. So my new plan is to draw the parrot, then outline it on my pieces of paper then fill the middle area with randomly cut pieces. I will be doing all of this at my desk and putting the pieces of paper in the mosaic on a larger piece of white paper.
I think I will focus mostly on the color and shapes of the mosaic. The color is very important as I previously mentioned as the outer picture must be quite dull creating almost a frame for the centerpiece. This will hopefully make the parrot pop and draw the viewer’s attention there. As for the shape, I am deviating a lot from the original so I am really going to have to figure out a way to represent the original picture with this completely different style. Hopefully, by looking at my mosaic the audience will be able to recognize the Parrot Pergamon’s original meaning whilst also recognizing that using differently shaped tiles can provide a refreshing viewpoint. This is my goal as through using these different tiles I am trying to prove a piece of art style can be manipulated without the meaning being damaged.
An artist that I am taking inspiration from is a smaller artist named Volodymyr Yagodka. Although Volodymyr is not making mosaics out of paper in his mosaic titled Woman in Red, he uses some similar elements to mine. These being a dull background used to make the centerpiece stand out along with the use of more jagged and randomly shaped pieces.

https://www.pinterest.com/pin/519321400758255751/?mt=login link to the video: https://www.pinterest.com/pin/mosaics-tutorial-monstera-mirror-video–509821620317926028/
(Video is not using paper but the use of random shapes and piecing together as she goes is what I will be doing along with her having a premade outline to arrange them in. Also, I will similarly not be gluing it down while constructing it.)
-
How I will recreate my mosaic
-Jack Geibler
I intend to recreate my mosaic using pebbles to represent the tiles. I am using pebbles because they are small so I can get more definitions of the mosaic. The mosaic has a red trident and a grey dolphin. The pebbles are already grey so I will keep the pebbles for them. I will set up my pebbles for the trident first. I need to make sure that I leave room for where the dolphin overlaps the trident. Once they are set, I will spray paint them red to get them colored without messing with the color of the dolphin. I will also be putting it on cardboard instead of a posterboard because rocks are heavy. A normal posterboard would definitely not be able to support the rocks. I will build it in my garage because I will be using spray paint which can get messy and would have more room in there. I will focus mainly on the shape of the mosaic because that is the most important for being able to tell what the mosaic is of. If I get the shape down then everything else would be easier. The shape and difference of colors will be the main aspects of this piece. I anticipate that gluing down the rocks may not work fully. I may have to work around that because I bet some would fall off. I hope the audience sees the tile-based picture I used. That shows the similarity to a mosaic. I have seen this from the story of Jeffrey Bale creating art/mosaics out of rocks. His purpose was to connect his art to nature and succeeds in doing so. Both of our works use small rocks to build up creating a bigger picture. I saw this and was encouraged to try myself. It is not an easy task, but with enough practice, Bale shows that it can be created in a beautiful way. I also hope for people to see the accuracy of my mosaic. I will bring past experiences with using glue for projects. Many times I have messed up using glue so now I will put extra focus on that aspect. I will also do my work over time. I will need time to wait for the spray paint and glue to dry. Also, it is more efficient for me to start my work earlier because my results are usually better.
Display and explanation of Jeffrey Bale’s mosaic’s made of rock. He also goes in depth relating his work back to ancient mosaics as I do in my work.
-
Recreating Parrot Pergamon Mosaic
By: Connor Bravo
Recreating the Parrot Pergamon mosaic will be a pretty fun but also tough task that will definitely look stunning in the end. Thinking about the materials to use to recreate it was also a little hard because of how many options there are you can use. The materials I have chosen is crayons, markers, and a decently-sized canvas. I have chosen to use crayons, because I thought to melt them using something like a hairdryer to get that cool looking spread effect of the crayon. The crayons would give a beautiful color to the parrot and make it look really cool. I have chosen markers so that I can outline where those melted crayons will melt so it just doesn’t look like a big blob of color. Using a canvas instead of a full piece of paper will make the mosaic look pretty big especially since I have a lot of crayons here and have nothing else to do with them. I will design this mosaic in my basement, because that is where all of my art supplies are and that is where most of the room will be. It’s also very cold down there so I hope that will cool down the crayons so that they dry quicker.

Melted Crayon Art (Giraffe) The main aspects of the mosaic that I will be focusing on is the color of the mosaic and achieving that original look of the bird. I want the color really to pop out of this mosaic recreation. I also want it to look very similar to the original with a little twist. Some problems that might come up is how long it will take for the crayons to melt and how long they will actually dry. Also, not making a mess with all of this is an issue. I hope the audience will be able to see how much hard work I put into this mosaic, how mosaics can still be recreated today in many different ways, and how something like this mosaic can influence next generations of art. I really want the audience to focus on how the colors pop and how each color blends in with each other to make it look really nice. I also want them to focus on which colors I use and where I put each color so that the recreation can look like the original mosaic. I used to be an artist and draw a lot. Doing this project might get me back into art and start doing stuff like this again. My dad is also an artist so I could get some tips from him while doing this. Many other artists still create mosaics too. This one artist doesn’t melt the crayons but still creates mosaics using them: https://youtu.be/VQm0X8yzHA8

Parrot Pergamon Original Mosaic Recreating this mosaic will be a challenge but a fun one that I am excited to take on. I think that the outcome of this will be really cool and I’m glad to be sharing it with the class.
Works Cited:
http://www.my-favourite-planet.de/english/middle-east/turkey/pergamon/pergamon-photos-02-012.html
-
Subscribe
Subscribed
Already have a WordPress.com account? Log in now.
