-
How I Will Recreate the Parrot Pergamon Mosaic
Peter Bashore
For recreating the Parrot mosaic, I will be using Legos as my medium. Because of the nature of a mosaic (using separate tiles), I will not be connecting the Legos like you typically do, but rather laying them next to each other with the studs up, as to make it “tiled”. I am using Legos because they come in a wide variety of colors, as well as for the fact that many of the Lego blocks are rectangular, allowing for the “tile” look to be preserved. I will likely build it on a flat posterboard in my basement because I will have enough space to make a large mosaic. I am going to outline and color code each area of the board based on what color is in that location on the original mosaic to make my life a little easier while laying the Lego bricks down. The aspect of the mosaic that I will be focusing on the most is the colors of the original mosaic. I want my recreation of the mosaic to be the most accurate that it can be, and Legos provide vibrant colors that can make the mosaic have the necessary contrast and “pop” similar to how the original Parrot mosaic looked. Because this mosaic was originally a floor mosaic, I will have my mosaic laid out on the floor.
The only problem I anticipate at this point is getting the Lego blocks to stay in place while I am placing them. I don’t want to glue them to the board because it would be quite annoying to clean up and make neat, but if I end up kicking them by accident or nudging them out of place too much I may resort to gluing or some other form of adhesive to keep it still. With my mosaic, I want my audience to feel like they are looking at something close to the original but with more vibrant colors. I want them to feel like they are looking at an actual recreation of a work of art instead of just a blob of blocks on a board. An inspiration I have for using Legos to create this mosaic is Joseph Kraham. He uses Legos as his medium for creating mosaics just like I plan to do. You can see some of his art in this video. Overall, I feel like the colors of the Legos will provide a different look to the mosaic while still providing a similar picture to the original.
-
The Recreation of an Ostia Antica Mosaic
Braden Smearman
The recreation of a mosaic isn’t the easiest task in the world. You have to figure out materials, shapes, colors, and size. Without using tiles, it can be difficult to accurately recreate. I decided to use beads to recreate my mosaic, as they can be easily manipulated and moved around to accurately recreate the mosaic. I will need to buy a surplus of black and white beads, as they are the two colors that make up my mosaic. An example of these beads are:

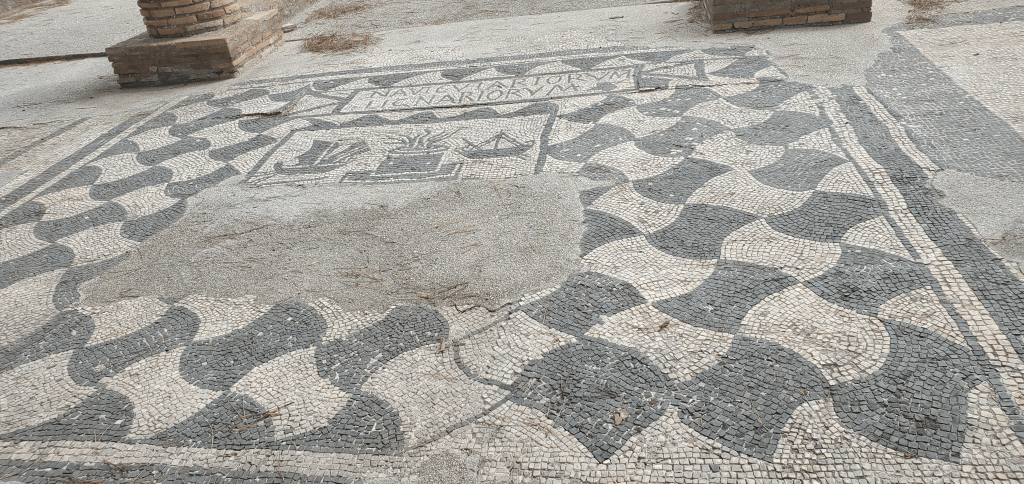
I plan on also buying a large posterboard to hold my mosaic. I will likely construct my mosaic on my dining room table, as it provides a flat surface to build on. As for the mosaic itself, I don’t plan on fully recreating the whole mosaic. I plan on focusing on the two boats and the fire pot in the middle, with the border around it. This is the main aspect of the mosaic and is the only part that can be deciphered to mean something. The patterns surrounding don’t really contribute to the story or history, as much as the main figures.

While creating the mosaic, there is one problem that I foresee. When I am placing the beads down, they can be easily messed up or scattered around on the board. This can make it difficult to recreate. I plan on countering this problem by using glue to paste down the beads to keep them in place. I will make an outline with a marker of the figures, and glue the surface of the outline. Then, just place the beads in the outline and they’ll stay in place. An article that will be in assistance to me is: https://www.ehow.com/how_7546730_create-mosaic-beads.html. I hope that my audience will be able to tell that I am trying to recreate an Ancient Roman mosaic that shows a part of history. I hope they understand that although it won’t be perfectly accurate, it’s still legible and comprehendible. Also, I hope the audience understands that I am mainly focusing on the color aspect of the mosaic. I really focused on making the colors as accurate as possible, in hopes of it looking similar.
https://www.rachelyoungart.com/?pgid=k4vlxv992-e0a806ab-d41c-4b1e-a35d-69030b3ac234
This article helped influence my mosaic because of the wide use of colors. This showed me how big of a role that color can play in the creation of a mosaic.
Recreating this mosaic will be a new experience for me, as I have not really done a project like this before. I have never been an arts and crafts kind of person, but I am excited to prepare my mosaic and try a new experience.
-
The Parakeet’s Plan (Aaron Caddick)
In order to build my mosaic to its highest potential, I need to plan the process behind its creation.
The first, and arguably most important part of the mosaic, which I will maintain most of the focus on through the creation, is the material it’s constructed with. For this particular mosaic, more speccifically the parrot, I plan on using a collection of sheeted aluminium, screws, and nuts. As more contemporary mosaics are being created, metal is becoming a significantly more popular choice in creation. It can be polished, weathered, and changed more dramatically in comparison to the traditional choices like stone and glass. As for the screws and nuts, I plan on using those to connect the metal to the base. However, I have another use for them in order to give the parrot a bit more depth. I plan on using multiple lengths of screws in order to give the mosaic an unconventional 3-dimensional look. The varience in height from the base wouldn’t be too significant (only a few milimeters at most) but it would be visible enough to create an effect of depth no matter where you look at it from.
More important parts of the mosaic would be the depicted flooring, standing box, shadow, and background. For the flooring, I would most likely use an evenly separated zinc sheet so that I could not only match the blueish-gray color of the mosaic’s flooring, but also be similar in nature to the material of the bird to give artistic uniformity material-wise. For the box, I would once again use sheeted metal (copper) bolted to the base in order to once again match the color shown in the original mosaic, as well as to match the sort of material used with other portions. The shadow and base however, would be different. For the shadow, I would use a black tinted piece of plastic. This would give a transparent appearence, alowing me to use other materials without having to worry about depiction of realistic lighting due to the plastic’s overlaying nature. Last but certainly not least, the base would made of a thin 24″x18″ piece of dark oak. This would allow easy connection of the metal to a secure platform through screws and nuts, and would also be sturdy enough to hold the weight of the metal parts used in other portions.
An example of this metallic usage is seen in Matt Small’s work:

A mosaic from Matt Small, constructed mainly of scarp metal found in London alleys. https://mymodernmet.com/matt-small-mosaic-portraits/ He uses random scrap metal organized in various shapes in order to depict the person seen. I plan on doing something similar with this in referrence for shaping, just with a bit more depth and rather “fresh” metal.
Despite all this, some problems may come up. For example, the wood may be too fragile in order to withstand the barrage of screws inserted into it. The metal may also corrode, and change it’s appearence from what it once looked like. However, in working with metal in other areas such as robotics, I’m sure I’ll be able to combat these. My robotics work is my main influence in using the resources I am. The constant mechanical and structural applications of metal can have people view that resource as only having one use. However, I hope that my audience can take away that not every has to conform to a single niche.
Works Cited
– https://mymodernmet.com/matt-small-mosaic-portraits/ -
Recreating the Ostia Antica Mosiac
Matthias Pridgeon
The first step in the planning of my recreated Ostia Antica Mosaic was to decide which facet of the original mosaic I should most try to emulate, as that would determine the material and techniques I used. Based on the mosaic I chose, which has many complicated but interesting forms, I wanted to focus on accurately replicating the figures and creatures in the mosaic.
Because of this decision, I decided to utilize a somewhat boring method, but one that will, with time and patience, allow for a very accurate replica to be made. I will be using cardboard cut into small squares, about the size of computer keys, and gluing them to a background for easy transport. Then, I will paint them black and white, to mimic the original color scheme, with extreme attention care when drawing the forms.
The greatest challenge with this method will be the outlining of the shapes. As I mentioned before, the shapes are detailed and complicated, and it will be no small feat to represent them accurately. Though I will only be doing a small portion of the larger mural, I want to recreate the spirit of the piece; doing so will necessitate the recreation of at least a few figures. The picture below is the exact portion of the mosaic I intend to recreate. I choose this portion because I feel that is captures several interesting figures, while remaining achievable in scale for me to recreate. For example, I can capture the central horses which pull the chariot but will not need to draw their full bodies. It may seem strange to cut some figures into pieces, but I feel it adds to my recreation by signaling the viewer that this is merely a portion, and a small one at that, of a massive piece which encapsulates far more figures and forms.

Selected area of the mosaic, full of interesting shapes and images. I hope that my recreation will evoke a feeling of the ancient port city. At least for me, the original mural strongly evokes this feeling, through its depiction of many maritime deities and creatures. Part of this feeling of antiquity is also the sense of aged material, of a masterpiece that has been damaged by the passings of the centuries. I want to attempt to recreate this by drybrushing and apply washes (paint mixed with soap and water) to the finished mosaic, to make it appear aged.
For my online influence, I found an interesting tutorial on the creation of aging of vessels to produce a faux antique effect: https://www.youtube.com/watch?v=aXQ5CZq4JPk (I recommend watching from 7:30-9:37). Her process is incredibly similar to what I plan on using to age the background of my mosaic. The stippling of several shades of colors can produce incredible effects. The video even uses an order of colors similar to my plan, involving a dark splotched base coat following a white priming, then middling tones, and finally a brighter overcoat which adds a vibrancy and contrasts the darker, deeper tones.
For influences, I really wanted to follow in the footsteps of Mr. Doyle, the art teacher here at Calvert Hall. I am in the second year of the art program, and already Mr. Doyle has elucidated so many incredible techniques. If I am thorough and careful, I might hope to make something up to his standards.
-
How I will make my Dolphin
Ben Cuomo
As I am beginning to start to think how I will create my mosaic I need to first come up with the material I will use. The section of the Delos House of Dolphins I am choosing to recreate is a singular dolphin surrounded by tile. The dolphin is a grey-ish color and the tiles surrounding are white. Because of this, I am less focused on creating the perfect color matches and more focused on making sure the shape of my re-creation is very recognizable in relation to the shape of the actual mosaic. Therefore, the materials I have chosen to use are pony beads. Specifically white and grey beads for each part of the mosaic respectively. In my opinion, they are not too small to the point where they will be too hard to put down, but also not too big to the point where the image won’t be detailed enough. These are pictures of the pony beads I am planning to use:


I am also planning on using craft foam to create borders to separate the beads. My reasoning for that is that I will allow me to form outlines to make sure the mosaic is really accurate and also as an alternative as adhering all of the individual beads down. I got this idea from a video I saw on YouTube, here is that video: https://www.youtube.com/watch?v=zPEJWe2wdgo. Specifically, from 6:10-6:20, you can see how putting beads down is very easy using this method.
I will make this re-creation of my mosaic on a piece of poster board. This will allow me to have a uniform background and also a singular place to keep it. The problem I am most anticipating facing is keeping the beads in place. I am using the borders to help, but I would not be surprised at all if the beads get pushed out of place multiple times throughout the process. Gluing them down would help, however the round nature of the beads would make it hard and, in my opinion, not worth it to do. I’m hoping that my recreation is a very close, almost mirror like image of the original mosaic created thousands of years ago. So far in life I have used beads to make many things, because of this previous experience I felt inclined to use these materials to recreate this mosaic as best as I can. Another thing from life which has influenced me to used pony beads is mosaics and other pictures I have seen recreated before.

Favorite Bead Mosaic I have seen Mosaics such as these have led me to the conclusion that using pony beads can help create very accurate recreations of mosaics. Something I really like about this specific mosaic is the color distinction. You can see the clear difference in colors, and it helps to create a clear picture of what is being shown. This is something I hope my audience sees in my mosaic as well. I want for them to see clear color distinctions. Having this will allow them to get a better picture and hopefully see a closer recreation to the original mosaic.
Here is another source that influenced my decision, I won’t be following everything from this, but I will definitely use a good amount of it during the building process: https://www.ehow.com/how_7546730_create-mosaic-beads.html
-
How I Will Make my Mosaic
Peter Kelly 10/18/2022
As I begin to think about the artistic process, I first should come up with an easy, yet realistic way to represent my mosaic. I will probably use a large piece of cardboard or poster board, and I plan to use black and white dry beans. Since my mosaic is black and white, it is easier to come up with materials that match the colors, and I can focus more on the design and shapes of the image depicted in the mosaic. Beans can be easily tiled, and are similar in shape and size to tesserae used in the time period, such as glass or stones. I’ll probably use hot glue to adhere my beans to the posterboard. Here is a video that shows how to make a mosaic out of beans: https://www.youtube.com/watch?v=Fa95TL-eF7s


Beans I will use to construct my mosaic. I will most likely build this mosaic in my dining room. This is the biggest table in my house, and we have another table where we can eat meals. One problem I anticipate is having to transport my mosaic. If I have to move it while in progress, or even when it is done, I am worried that it will fall apart because beans are round, which means the surface area that is touching the glue is smaller, leading to increased chance of the beans falling off.
The aspect of the mosaic I will focus on the most are the boats surrounding a fire, with some of the rest of the pattern around it.
In my mosaic, I’ll focus on the center part with boats, as well as adding some of the diamonds on the side. I’m hoping the audience will understand how important these mosaics were to commerce. They were early “billboards”, and drew many people into their store to buy their goods. Maybe, to accentuate the importance, I’ll add some stencils of boats or small drawings to further represent the industry. My own life will influence the work because we live near the Chesapeake Bay, a major marine area. I enjoy going down there and going on ferries across it, and I’ll keep this in mind while making my work.
Article on modern mosaics: https://mecartworks.com/famous-paintings-recreated-with-mosaic-tiles/
-
The Barczak Plan to Produce a New Parrot Pergamon.
TJ Barczak
In my hunt to recreate this Greco-Roman mosaic, I realized many things. First, I love Michael’s. This craft store will hopefully someday become my next apartment; I can make crafts anytime I please. The medium I have chosen to compose the Parrot Pergamom is embroidery stitch, good ol’ embroidery stitch. Now you might ask, TJ, where did you learn to stitch? I didn’t. I just like making those summer camp friendship bracelets and said, “I can roll with this.”

$31 of Embroidery Supplies from Michael’s (Hoop, Fabric, & A lot of Thread) lain across my bed. My hoop setup is very mobile, so my work environment can change wherever I take it. I love that about my project because I won’t have to be cooped up in a room or basement to finish my project. I have achieved the ability to have options. How this will relate to the mosaic, mainly color and shape will be of note, color through the invention of dyed thread and the shapes of the main details in the mosaic. So embroidery floss can fill the whole hoop, and the background will distort into a circle. Some problems I am willing to anticipate are creating a parrot template, seeing that drawing isn’t something in my daily routine, and playing around with a new medium I have never tried (the stitching aspect). On the other hand, my drive to recreate a colorful parrot on a brick will keep my mind positive in this endeavor!
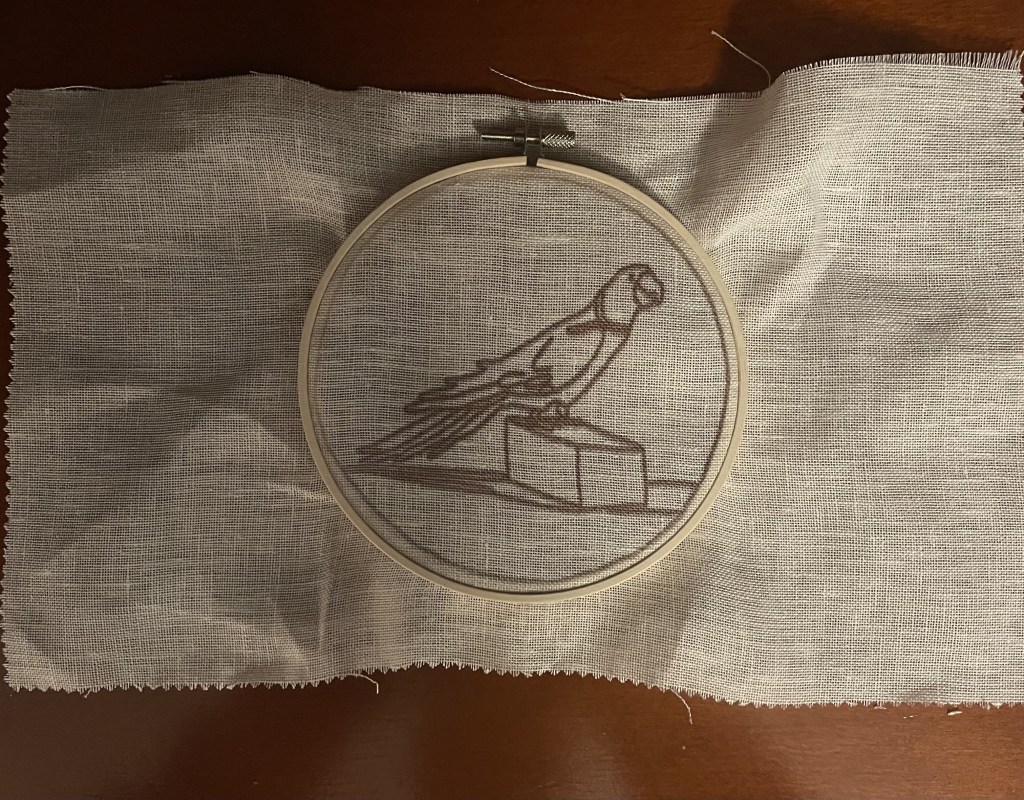
Homemade Template ready to be stitched! When audiences look at my composition, I hope to appreciate the fine details that coincide with the creation of this stitched parrot. Also, I want audiences to look into the contrasts of color between the background and foreground and the contours/shading of the entire piece. Pushing the thought away from the audience and more the maker, my sister is an influence on me whenever I try to do art. She’s my best consultant and lifeline if I ever feel that I’m struggling to “open my creative side” and just craft. Since she’s a sophomore at MICA, Renee knows a tip or two when it comes to shrinking down work time or working out an art-related problem. For that, I often thank her. Another influence I’m taking is the style of the stitch which I’m inspiring my piece from (making this stitch slightly simpler). This video by Sarah Homfray Embroidery explains a condensed mosaic stitch: https://www.youtube.com/watch?v=Nvbpbg_xQBY. This stitch can give off the effect of a mosaic tile with smaller “groves” surrounding more full sections. I’m super excited to work on my recreation of the Parrot Pergamom and the peaceful stitching I get to do for the next couple of weeks!
-
Historical Background of Parrot Pergamon
by Eric Meyer
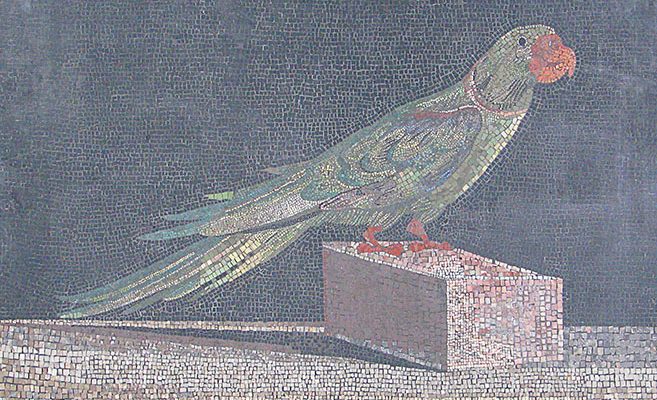
Parrot Pergamon is a Greek mosaic floor panel depicting a parrot of the Alexandrine species. This type of parrot called the Alexandrine parakeet is predominately green with a large red beak. The Alexandrine parakeet is named after Alexander the Great who exported many of these parrots from northwestern India to Europe and the Mediterranean where they became popular among the upper class and valued by people of royalty and nobility. This popularity is one of the reasons this bird was chosen to be the subject of the mosaic. Parrot Pergamon mosaic was created around 150 B.C. in Pergamon, an ancient Greek city in modern-day Turkey. This mosaic is in Palace V of the Pergamon Acropolis. Within Palace V, in a room called the altar room, is a large mosaic floor that includes Parrot Pergamon.
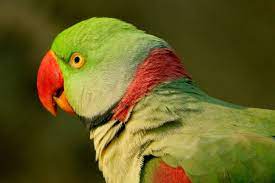
Alexadrine parakeet Not much is known about the artists of the mosaics that created this large mosaic floor in Pergamon Palace V. One panel of this mosaic floor was found that illustrates a piece of paper with the signature “Hephaiston”. Much of the surrounding art has been destroyed. The central panel with the signature can be found in the Pergamon Museum, in Berlin, Germany along with The Parrot Pergamon and many other mosaics from Pergamon. This museum was built between 1910 and 1930 to showcase dug-up hallenistic works of art, such as the Pergamon Altar. A virtual tour of this museum is shown in this video https://youtu.be/ncEGTAI3HUw. There is only one known reference to a mosaic artist in ancient literature by Pliny the Elder, who brings up the artist Sosos, who created his art in Pegamon.
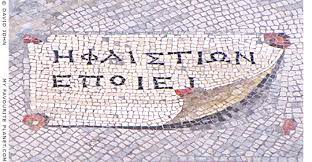
Hephaiston’s signature Parrot Pergmamon is called an emblema and created using the technique called opus vermiculatum, which translated from Latin means “worm-like work”. Opus vermiculatum is a method created in Greece that uses small colored cubes of stone called tesserae to construct an image. This technique used dark-colored tesserae to contrast and highlight the main designs which often depicted using bright colors. Rows of tesserae are used as outlines and help the design look more like a picture. The artist of Parrot Pergamaon approaches the design like a painter, and attempts to make the work as realistic as possible. This mosaic is similar to a style called trompe l’oeil realism because of its use of shading in order to portray the parrot as three-dimensional. This short video outlines how opus vermiculatum was performed, https://youtu.be/u0rDj-hOViM.
Many mosaics such as Parrot Pergamon and other emblemata were made to be transported from the artist’s workshop where they were created, then to the location where they would be installed. Having the ability to create it, then transport it, made it easier for the artist to execute the opus vermiculatum technique because its difficulty to perform. The mosaics would then be handed over to other workers who would use cement and mortar to install the tile into the floor.
Works cited
http://www.my-favourite-planet.de/english/middle-east/turkey/pergamon/pergamon-photos-02-012.html
https://www.britannica.com/art/opus-vermiculatum
https://artsandculture.google.com/partner/pergamonmuseum-staatliche-museen-zu-berlin
-
The Pergamon Parrot Mosaic
By Brendan Sipes
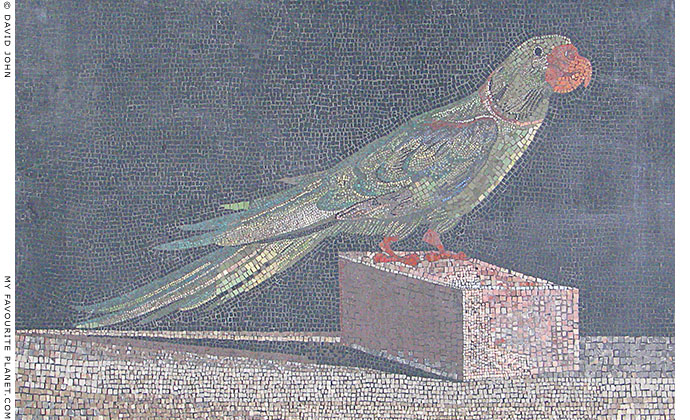
Parrot Mosaic in the Pergamon Museum The Parrot mosaic was made in Hellenistic period of Greece around 200 B.C.E. The mosaic was designed after the Psittacula eupatria or Alexandrine Parakeet which was named after Alexander the Great. The bird was “An exotic pet owned by the nobility and the elite”. The Psittacula eupatria is the largest Asiatic parakeet at a size of close to twenty-five inches.

Psittacula eupatria/Alexandrine Parakeet The Greeks first started developing mosaics as a form of art in the eighth century B.C.E. The mosaics were made of stone and were simplistic in pattern. However, The Greeks were highly innovative and made many more intricate and difficult designs by implementing the use of smaller pieces and symmetric patterns into their mosaic work. As time passed, Mosaics became an important symbol of wealth and honor.
The parrot mosaic in the Pergamon museum was made using a special type of Hellenistic style called opus vermiculatum which means wormlike. This means that part of or all of the mosaic was made of small and closely set cubes of stone, ceramic, glass or other materials that are different colors and have fine outlines of a centralized figure. This figure was then surrounded by a geometrical pattern or design.
Here is a video of someone using the opus vermiculatum or wormlike style to create a simple mosaic. You can see the clear center figure made of brown blocks, and a geometric pattern as the background made of different colored blocks to highlight the center piece of the mosaic.
The original parrot mosaic is no longer intact, but the one displayed today is a copy made in 1955. The original parrot has only survived in fragments and was removed from the museum as it had started to decay. This decay caused a need for a reconstruction of the mosaic. The new mosaic that is currently being displayed in the Pergamon Museum in Berlin, was made by using fragments of pieces from other mosaics in the Telephos Hall and integrating them into the original to preserve the artwork.
The artist credited with the creation of the original parrot mosaic in 200 B.C.E is unknown to us due to lack of information regarding the creation of this artwork. However, it is known that this mosaic was originally made as a floor tile, rather than just a piece of art. The mosaic was also made to honor Alexander the Great, which is why the Alexandrine parakeet was chosen as the center piece of the mosaic.

Pergamon Museum in Berlin, Germany The mosaic is currently located in the Pergamon museum in Berlin, Germany. The Pergamon museum was built from 1910 to 1930 and housed excavated item found by museums in Berlin. It gets its name from one of its main attractions, the altar of Zeus from Pergamon, which was located in present day Turkey. Today, the museum holds Architectual remains, sculpture, pottery, jewelry, and other art from the Greco-Roman (Ancient Greece or Roman) era.
Works Cited:
https://www.britannica.com/topic/Pergamonmuseum
https://www.britannica.com/art/opus-vermiculatum
https://dome.mit.edu/handle/1721.3/146676
phttps://www.thesprucepets.com/alexandrine-parakeets-as-pets-390267ets-390267
-
The History of Parrot Pergamon
Peter Bashore

Parrot Pergamon Museum Recreation (Source) The “Parrot Pergamon” mosaic is believed to be made in the middle of the 2nd century BCE during the spread of Hellenism across the Mediterranean area of Europe. During the Hellenistic Age, mosaics were created and used as the most common form of decoration. They were often found in the rooms most used for entertaining guests, like the dining room. Mosaics were also used to decorate large public buildings, baths, and pretty much anywhere where they could fit one that would be seen. If you would like to learn more about the Hellenistic Age and its art, click here.
The parakeet seen in the mosaic is only part of the floor mosaic as a whole, as there are other portions of the mosaic that I will not be focusing on.
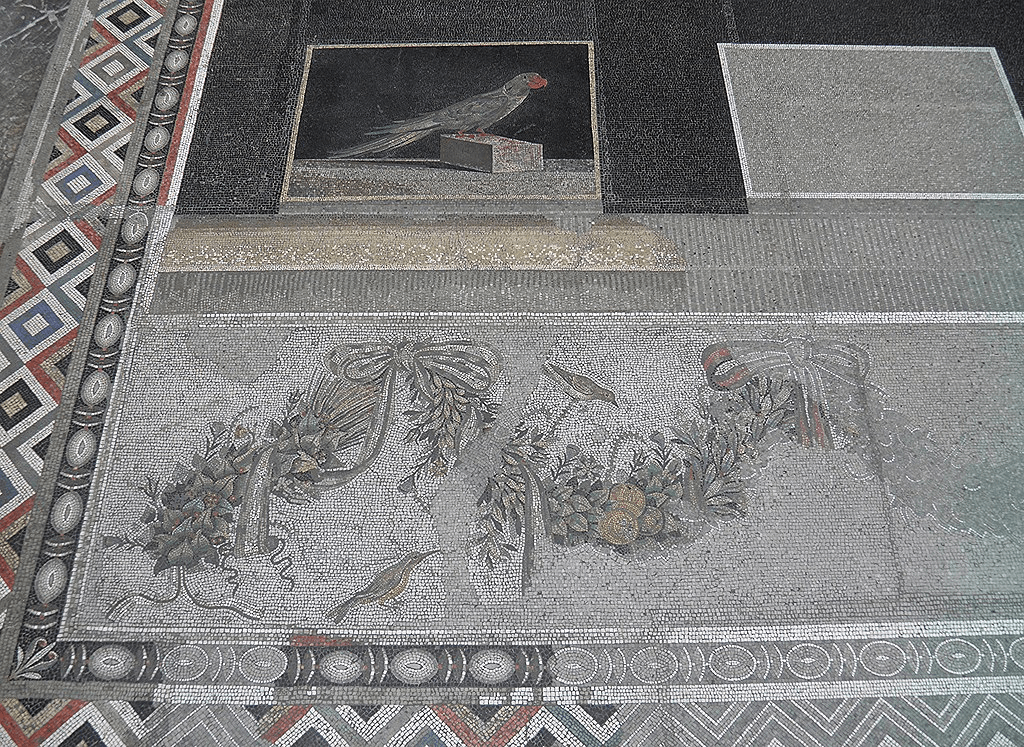
Larger portion of the Parrot Pergamon Mosaic (Source) The original version of the mosaic was found in the floor of the altar room of the last royal palace built on the acropolis of Pergamene, also known as Palace V, in modern-day Turkey. It was discovered in 1886 by Richard Bohn and his team of excavators. Some parts of the mosaic were removed in the ancient times, adding to the difficulty of seeing and recreating the entire mosaic. Although the original mosaic cannot be seen today in a museum, a copy of it has been made and is on display in the Telephos Hall of the Pergamon Museum, which can be found in Berlin, Germany. The remaining fragments of the original mosaic are in various conditions, with the head and neck area and the lower feathered area being significantly more deteriorated than the border and background of the mosaic, which have been preserved much better than the main focus of the mosaic, which is the parakeet itself.

Palace of Pergamene (Source) The bird depicted in the mosaic and the image below is a ring-necked parakeet, or the Alexandrine Parakeet, named after former Greek ruler Alexander the Great. Alexander the Great brought the parakeets back to Greece after a trip to India. The noble people of Greece kept these birds as pets to show their status.

Alexandrine/Ring-necked Parakeet (Source) Unfortunately, the mosaic was created by an unknown artist. It is likely that it was created by a hired mosaicist by the noble people who lived in Palace V.
The mosaic itself is made out of very small stone, glass, and other rocks. This combination of materials is known as tesserae. The tiles are so small that it can be difficult to see the gaps in between each tile if at a great enough distance from the piece. When an artist uses these very small tiles, it allows them to essentially “paint” with tesserae to create their artwork, making it look more clean and together, as well as allowing them to add more minor details to the mosaic. The vibrant colors of the bird allow it to pop more and be the main focus of the mosaic. The use of vibrant colored tiles was commonly seen in Ancient Greece, as the most famous Greek mosaicist from the ancient times, Sosos, also employed this strategy. An outline of the main picture was also commonplace in mosaics at the time, as exhibited in this mosaic. You can see how the black tiles placed around the bird are tilted in a different direction to distinctly outline the bird, similarly to how it is seen in drawing on paper.

Closer look at the “outline” of the parrot (Source) Usually, mosaicists would create their mosaics in panels called emblemata. They would create the entire mosaic in their workshops separate from where the mosaic would eventually be placed. They would then move the emblemata from the workshop to the site of where the mosaic will be placed and would have it cemented into the ground using mortar.
The reason for the mosaic being created is not exactly known, although it is likely it was to commemorate the Alexandrine parakeet because of the noble people’s tendency to keep them as pets. The Parrot Mosaic is a relatively mysterious mosaic and is a famous example of a mosaic from the Hellenistic Age.
Works Cited
https://artsandculture.google.com/asset/parrot-mosaic-unknown/dAHr0Sez7P1WiA?hl=en
http://www.my-favourite-planet.de/english/middle-east/turkey/pergamon/pergamon-photos-02-012.html
-
Subscribe
Subscribed
Already have a WordPress.com account? Log in now.
